VUnit and UVM are two increasingly popular standards in the field of HDL verification.
VUnit, as the name suggests, is primarily intended for unit testing. Compared to system tests, unit tests are typically small, and VUnit test are written by designers or verification engineers in the same HDL as the design. VUnit supports both VHDL and SystemVerilog for designs and testbenches.
The Universal Verification Methodology (UVM) on the other hand is intended for testing complex systems and subsystems. The UVM test infrastructure extensively uses object oriented programming in SystemVerilog. In larger companies in particular, separate verification teams develop these complex tests. Designs under test may be written in VHDL, SystemVerilog or a mix of both languages.
This article explores how to combine these standards, and how the combination can benefit design verification. While the combination of VUnit and UVM has been discussed before , it may not be trivial at first to actually get it working. We’ll also demonstrate how the combination works in Sigasi Visual HDL.
Benefits: why combine UVM and VUnit
Before we explain how the technical details and show how to run UVM tests in VUnit let’s take a step backwards and answer the question: Why would we want to do that? As mentioned, VUnit and UVM serve rather different purposes. VUnit is meant for smaller, relatively simple unit tests whereas UVM is intended for complex system tests. There are a few use cases though in which we think that it makes sense to combine them.
- VUnit automates the extraction and execution of tests from your project, and aggregates the test results. UVM doesn’t have such mechanism. This automation offered by VUnit is useful both for designers who wants to validate their code changes, and for a Continuous integration (CI) system.
- In a large organization, UVM tests may be developed in a verification team which is separate from the design team. To avoid that code changes from the design team break the UVM tests too easily, the verification team may provide a small UVM smoke test which designers can run as part of their unit test batch before they commit code changes.
Combining UVM and VUnit
For our demonstration of how to run an UVM test in VUnit, we’ve set up a demonstration project based on an open source UVM example . The design under test is a simple adder, which reads in two two-bit numbers and produces the sum. The original adder design is written in plain Verilog. Note that for our demo we’ve used a bleeding edge version of VUnit (4.6.1rc0). At the time of writing, 4.6.0 was the latest official release, but the newer version improves support of mixed languages in VUnit. The demo project documents how to obtain a compatible VUnit, until the next VUnit is released.
Apart from a couple of small improvements, the design itself and most
of the UVM test environment don’t need changes to run in VUnit. The
top level testbench requires changes for VUnit, and you need a
run.py script to control VUnit. Let’s take a look at the updated
testbench first.
`include "vunit_defines.svh"     // Include both VUnit and UVM headers
`include "uvm_macros.svh"

`include "simpleadder_pkg.sv"
`include "simpleadder_if.sv"

module simpleadder_top_tb;       // Module name must be VUnit compliant
   import uvm_pkg::*;
   import simpleadder_pkg::*;

   // UVM Interface declaration
   simpleadder_if vif();

   // DUT instantiation
   simpleadder dut(.clk(vif.sig_clock),
      .en_i(vif.sig_en_i),
      .ina (vif.sig_ina ),
      .inb (vif.sig_inb ),
      .en_o(vif.sig_en_o),
      .outp(vif.sig_out )
   );

   // VUnit test structure includes UVM
   `TEST_SUITE begin
      `TEST_SUITE_SETUP begin
         // UVM does not control the end of the simulation, VUnit does that
         uvm_root root;
         root = uvm_root::get();
         root.set_finish_on_completion(0);

         // Registers the Interface in the configuration block so that other
         // blocks can use it
         uvm_resource_db#(virtual simpleadder_if)::set
         (.scope("ifs"), .name("simpleadder_if"), .val(vif));
      end

      `TEST_CASE_SETUP begin
         // Initialize the clock
         vif.sig_clock <= 1;
      end

      `TEST_CASE("Simple Adder UVM test") begin
         // Run the UVM test
         run_test("simpleadder_test");
      end

      `TEST_CASE_CLEANUP begin
         // Report the UVM test result to VUnit
         uvm_report_server server;
         server = uvm_report_server::get_server();
         `CHECK_EQUAL(server.get_severity_count(UVM_ERROR), 0);
         `CHECK_EQUAL(server.get_severity_count(UVM_FATAL), 0);
      end
   end

   // Clock generator
   always
   #5 vif.sig_clock = ~vif.sig_clock;

endmodule
From the original UVM testbench, these changes were required to integrate it in VUnit.
- UVM as well as VUnit SystemVerilog headers are included.
- The top module name must comply with the VUnit standard, i.e. a
tb_prefix or_tbsuffix is required. The filename must consist of the module name and the extension.sv. - Most of the code for test setup, run and cleanup is embedded in the
VUnit structure. Note that macro
TEST_SUITEis an implicitinitialblock, so it can contain all sorts of initializations, but not e.g. analwaysblock for a clock driver. - UVM’s default to call
$finishon completion of the UVM test must be disabled. If UVM finishes the simulation, VUnit can’t evaluate the test result. - In the
TEST_CASE_SETUPphase, you can initialize signals as required. Further assignments (e.g. the clock generator) must be placed outside theTEST_SUITEblock. - Individual tests are run from the
TEST_CASEblock(s). As we can’t control simulator options from within the testbench, we can’t set+UVM_TESTNAMEto select which UVM test to run. Instead, we need to explicitly set the test name when callingrun_test(). To run multiple tests on the same DUT, add moreTEST_CASEblocks, one for each test. VUnit will run all tests and collect the results. - After completion of the UVM test, VUnit checks for the UVM test result
in the
TEST_CASE_CLEANUPphase. In particular, VUnit checks that no error or fatal conditions were met in the test.
In addition to the updated testbench, the VUnit run script (run.py) needs
a small change to support UVM.
import sys
# If using a downloaded version of VUnit, change the path below to your VUnit folder
sys.path.insert(0, "/home/wmeeus/git/vunit/")
from vunit import VUnit
import os

# Select simulator
os.environ["VUNIT_SIMULATOR"] = "rivierapro"

# Create VUnit instance by parsing command line arguments
vu = VUnit.from_argv(compile_builtins=False)
vu.add_verilog_builtins()

# Create library 'lib'
lib = vu.add_library("lib")

# Add design to library
lib.add_source_files([
      "simpleadder.v", "simpleadder_top_tb.sv"  # the SystemVerilog design and testbench
   ])

# Add a compiler option to support UVM
lib.add_compile_option("rivierapro.vlog_flags", ["-uvm"])

# Run vunit: compile + test
vu.main()
As you can see, the VUnit run script is mostly standard. The only
exception is the call of add_compile_option() near the end of the
script, where we tell the compiler to add UVM support. The exact flags
to use depend on your compiler/simulator.
In the above example, we have used the open source Verilog design from
Github. To demonstrate that this technique also works with VHDL
designs, we have translated the design into VHDL. As the VHDL design
is a different DUT, a seperate top level testbench is also required.
Note that the top level testbench for the VHDL design needs to be
written in SystemVerilog, because it needs to call SystemVerilog UVM methods.
The only difference in the top level testbench is the instantiation
of the DUT. Finally, to have VUnit test the VHDL design, we add the
VHDL design files and corresponding testbench to the VUnit run.py
script.
As shown below, VUnit runs the tests and reports the results.
==== Summary ========================================================
pass lib.simpleadder_top_tb.Simple Adder UVM test (2.5 seconds)
pass lib.vhdl_adder_tb.Adder UVM test             (2.7 seconds)
=====================================================================
pass 2 of 2
=====================================================================
Total time was 5.2 seconds
Elapsed time was 5.2 seconds
=====================================================================
All passed!
UVM, VUnit and Sigasi Visual HDL
In an earlier article, we
have discussed VUnit and its integration in Sigasi Visual HDL. In order
to configure a combined UVM-VUnit project, you’ll first need to set up
your project as a VUnit project. Then, you’ll need to add the UVM
library to your project’s Common Libraries to get it working, as
documented here. The
README.md of our demo
project
has the details of how to do it for that particular project.
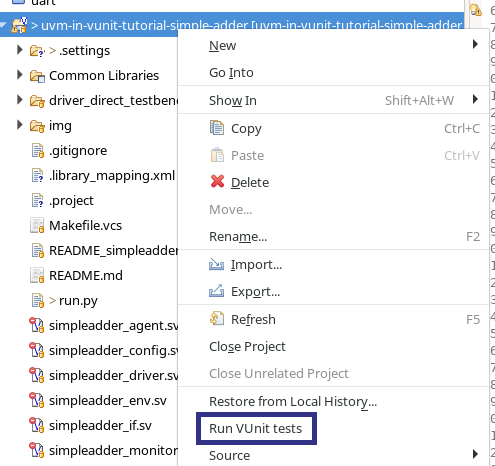
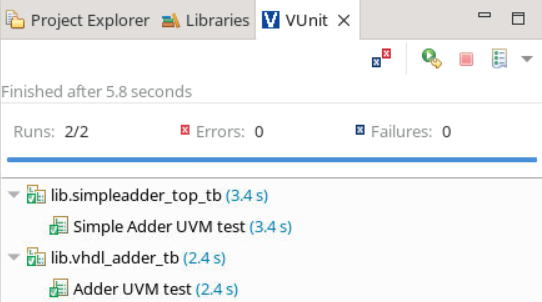
Once configured, you can run VUnit tests from within Sigasi Visual HDL, e.g. by right-clicking your project in the Project Explorer and selecting Run VUnit tests. Test results appear in the VUnit view, as shown below.
See also
- Using VUnit in a GitLab CI Verification Environment (blog post)
- VUnit: managing input files and compile order (blog post)
- Using VUnit for Real (blog post)
- How to configure VUnit using the Sigasi VS Code extension (knowledge)
- VUnit projects in Sigasi Visual HDL (knowledge)