Introduction
Continuous Integration (CI) and Continuous Deployment (CD) are getting more and more important in today’s development processes, especially when working agile/lean by using DevOps principles. It helps to find errors earlier, makes designs more reliable, and in the end it takes pressure off the FPGA developers who too often have really long days and nights to meet deadlines.
In a CI process, unit tests run after every commit to ensure that changes don’t break the functionality of existing code. This is known as Continuous Testing . In the past, employees needed to carry out tests by hand. Today, these tests are automatically carried out on a server and a test protocol is generated. Ideally, commits are avoided for deployment if tests fail.
One framework for running these tests automatically is VUnit , which is open and actively under development with regular bugfixes and new feature implementations. We assume our readers know the establishment and use of VUnit, which is outside the scope of this article.
Since version 4.1, Sigasi has a user-friendly way to manage VUnit projects. This is very important because, on the one hand, users run verification when it is easy to use and set up. On the other hand, verification runs the same way locally as in the CI process on the server side. This prevents wasting debug time by using different verification environments. The operation part of your DevOps team will be pretty thankful for that.
Getting Started
Part 1: Intoduction to the Example Project
A demonstration project can be found at the Sigasi public repository on gitlab.com . The repository contains a VHDL design of a 74161 4-bit counter, a self-checking VUnit testbench, and a GitLab CI configuration.
To run the testbench, we’ve used a public Docker image with GHDL and VUnit, provided by the GHDL maintainers. This makes the project ready to start. You can simply fork it into your GitLab account and play around.
Part 2: Prerequisites
- GHDL, supported since Sigasi Studio 3.7 (this article uses GHDL because it’s open - other verification tools supported by Sigasi work as well)
- VUnit Flow works within your Sigasi installation, supported since Sigasi Studio 4.1
- Gitlab.com (or self-hosted GitLab server) with GitLab CI enabled
This tech article uses GHDL within a Docker Container on server side verification. Docker setup and handling is outside of the scope of this article, but I promise to explain the Docker workflow in a separate article soon.
The Git repositories for demonstrating the content of this article and other Sigasi features can be found under https://gitlab.com/Elpra/sigasi-demos/vunit-example-ci .
Part 3: Let’s Setup a Local Development Environment
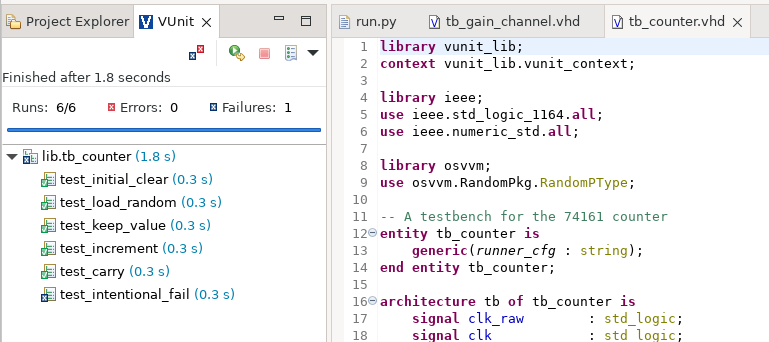
As a starting point, you can fork the example project into your Gitlab.com account and import it in Sigasi. The project is ready to go with the Sigasi VUnit Integration. If you are not familiar with the Sigasi VUnit integration, you should have a look at the VUnit projects in Sigasi Visual HDL tech article.
After running the VUnit tests in Sigasi, you will see six executed tests in the VUnit tree, of which one is failing (which is intended at the moment).
In the next parts, I will show what a simple development process could look like, to require developers to identify and fix failing tests before releasing their changes into the target branch. In DevOps language, we call this looking for green builds. You will see in a few moments what this means. ;-)
Part 4: Let’s Set Up a Remote CI Environment
Now that you have run your project with VUnit locally and you have forked it into your own Gitlab.com repository, it is time to get the CI pipeline running. The CI pipeline in GitLab can either be triggered manually, time scheduled, or (what we prefer here) on every commit pushed to the server.
To run the CI pipeline immediately after forking, you can go to the CI/CD menue and click on the Run pipeline button. Keep settings as they are and click on Run pipeline. While waiting for the execution, let’s have a look into the GitLab CI configuration file .gitlab-ci.yml. All the GitLab CI configurations are within this file. The main advantage compared to Jenkins (for example) is that this flow puts your CI process parallel to your code, including under version management. This unifies software versions and configuration management into a single process and ensures that you create reproducible builds.
The GitLab CI definition is YAML file. It’s syntax is explained in detail in the official GitLab documentation .
image: ghdl/vunit:mcode-master

vunit-test:
  script:
    - python3 run.py --xunit-xml test_output.xml
  artifacts:
    when: always
    reports:
      junit: "**/test_output.xml"
    paths:
      - "vunit_out/test_output/*"
The image keyword defines the Docker image which will be pulled from Docker Hub. In this case, we’re using the offical GHDL with VUnit Docker image, which is hosted here .
The script keyword contains the script that is executed in the Unix shell environment within the Docker container. Because VUnit is so simple to run, the script is too.
VUnit produces its outputs by default in the vunit_out folder. The artifacts keyword tells GitLab CI to store the files and folders specified under paths. The when: always part is used to store the artifacts even when the pipeline fails. A special feature is the reports keyword, which makes GitLab parse the junit XML file and report the results in GitLab itself. This can be found under the pipeline view and should look like this:
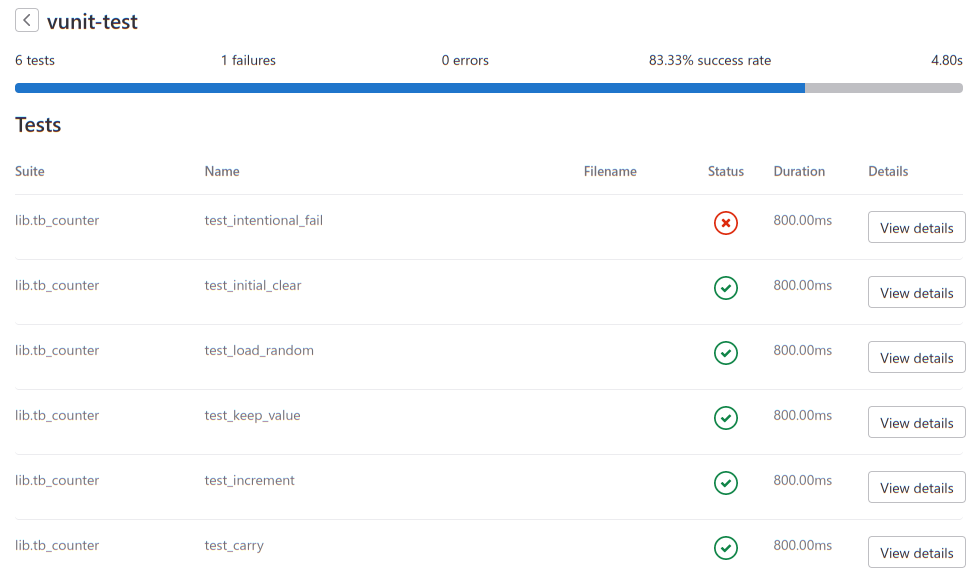
After reading this section, your triggered pipeline should be finished executing. And since we have a failed test, we have a red build, as expected. Now we can focus on getting a green build.
Part 5: If it’s broken - fix it!
Within a good development process, only green builds can be merged into the target branch. This is what GitLab manages for us. Therefore we have to fix something in order to make our red build green.
Our example contains an intentional failed test. See tb_counter somewhere around line 160. You should see
            elsif run("test_intentional_fail") then
                check(false, "This test is meant to fail");

            end if;
Simply remove these two lines and verify locally in Sigasi that all tests are running successfully now. When the VUnit View shows zero errors, commit the changes and push them to your remote target. The GitLab CI pipeline should trigger now and produce a green build.
You successfully fixed your design, which is now ready to merge and deploy. Congratulations on your first green CI build!
In daily business, your design, and related tests, will probably be much more complex. GitLab provides a wide variety of useful features to optimize your development process. Even deployment processes on real world hardware targets can be implemented, but this is a topic for a much larger tech article. See this article as a starting point for your modern DevOps process, to reach a maximum amount of design reliability by minimize the development time and costs.
About the Author
Thank you for reading this article. My name is Tobias Baumann and I’m a self-employed FPGA Developer and DevOps enthusiast. If you have any questions, don’t hesitate to get in contact with me (simply search for “tobias baumann fpga” - you can’t miss me ;-)).
I am not an employee of Sigasi, VUnit, GitLab, or any other tool mentioned. I’m just a Sigasi user (since 2011) who is happy with this piece of software. Because Continuous Integration and Continuous Deployment is becoming more and more important, especially in large and safety-critical designs, I’m pretty glad that the Sigasi team put VUnit support in their software. This is why I decided to write this tech article, which hopefully inspires others to optimize their development processes.
See also
- Using Sigasi CLI for HDL Code Verification in GitLab CI (knowledge)
- Using Sigasi CLI in Jenkins CI (knowledge)
- VUnit: managing input files and compile order (blog post)
- Running UVM tests in VUnit (blog post)
- Documentation generation in CI with Sigasi CLI (knowledge)