The VS Code Editor shows the content of files and allows you to edit them. It has a tabbed view such that multiple files can be opened simultaneously. The active file is the one currently selected.
VHDL and SystemVerilog Editor
The VHDL and SystemVerilog (or Verilog) editors are optimized to help you browse and edit VHDL and SystemVerilog code. Most browsing and editing features are similar for both languages.
Language-specific features are explained in the “VHDL Specific” and “Verilog and SystemVerilog Specific” sections.
Code Highlighting (Syntax Coloring)
The Sigasi Visual HDL (SVH) extension supports syntax and semantic highlighting.
- Syntax highlighting: colors code according to lexical classification (such as keyword or string).
- Semantic highlighting: colors code according to meaning (different colors for constants and signals).
Note that some VS Code themes might not support semantic highlighting. If you appear to be missing this feature, make sure you’re using one of the default VS Code themes. If the feature still doesn’t appear, get in touch with support .
- In themes that support semantic highlighting, you’ll see that names like those of a
port,signal, ortypeare a different color from language keywords.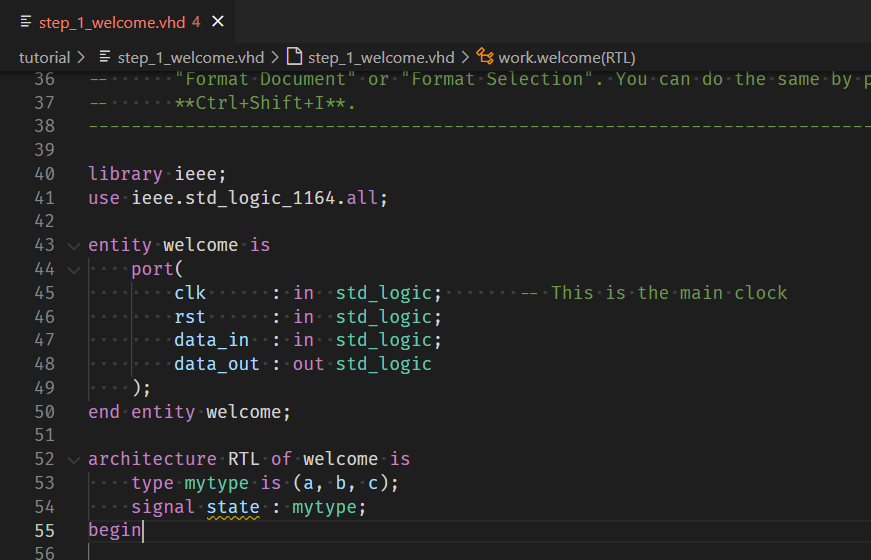
- In themes that do not support semantic highlighting, names like those of a
port,signal, ortypewill have the default text color.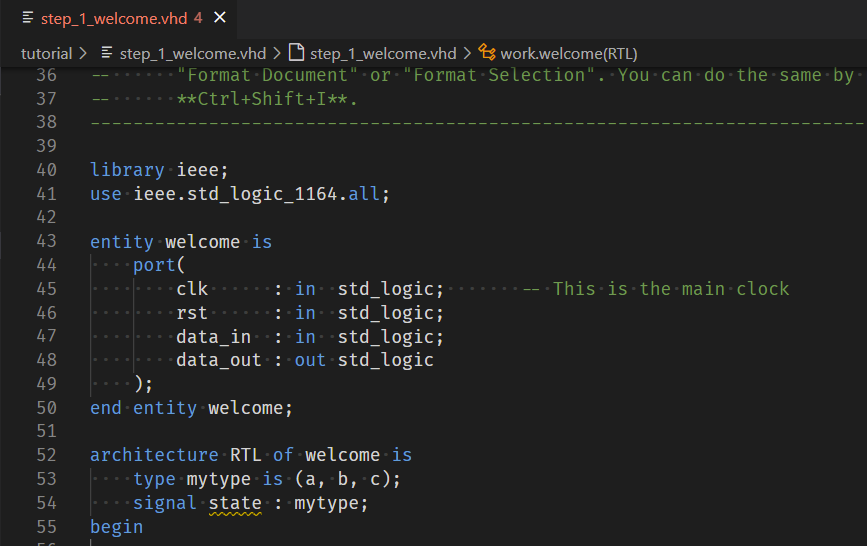
The latter might also happen when there’s no .project file in your root directory. Without this, the SVH extension will not start and only provides basic syntax highlighting.
See also:
Type-time Syntax Error Reporting
SVH marks VHDL and SystemVerilog syntax errors while you type. It will also report broken SystemVerilog preprocessor code.
Project Exploration and Navigation
SVH offers powerful techniques to explore a file or project and navigate through it. This section covers: Occurrence Highlighting, Find References, Go To Definition and Hyperlinks, and Hovers.
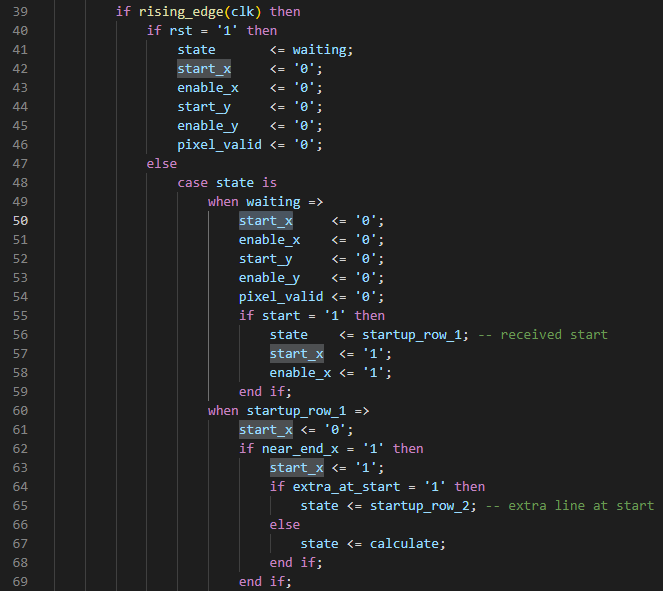
Occurrence Highlighting
Clicking on an identifier highlights it and all other occurrences of the identifier that refer to the same object. Note that this occurrence highlighting is intelligent: it is not based on the identifier’s string value but on the object to which the identifier refers. Only true references will be highlighted, not occurrences in strings, comments, or other such instances.
Find References
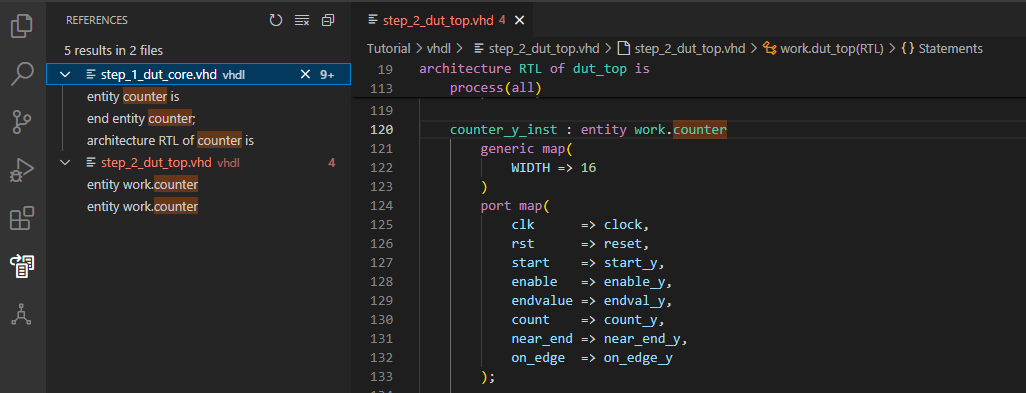
To look for occurrences of a given identifier throughout your design, place your cursor on the identifier and right-click. Then select Find All References.
A search window will appear to the left of your workbench, displaying all occurrences of the selected identifier. You can easily navigate through all occurrences by clicking the items in the list. Note that all occurrences are also highlighted in the editor, making them easily recognizable.
Go To Definition and Hyperlinks
You can easily navigate to the declaration of any port, signal, entity, etc. Place the cursor on the identifier, right-click, and select Go to Definition. The editor immediately jumps to the declaration.
You can also navigate your code like a web browser by clicking hyperlinks. If you press and hold the Ctrl key, hyperlinks will appear in your editor. If you click a link (while holding the Ctrl key), you will navigate to the target of the link.
Hover
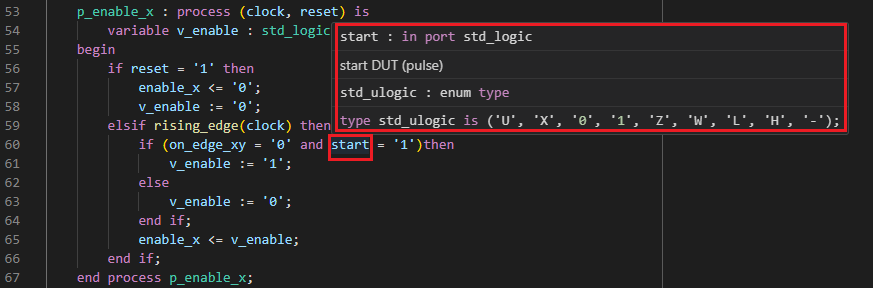
To learn more about the declaration of a given identifier, you can hold your mouse over it. After a short time, a popup will show you the name and datatype of the signal. This technique is called hovering.
Hover pop-ups can show different kinds of information:
- datatype
- comments: inline documentation written for the declaration (association rules)
- value: the value of constants
- errors or warnings: a description of the problem, if the given identifier has an error or warning associated with it
- binary/decimal conversion: for hexadecimal, octal, or binary values, the decimal equivalent
Autocomplete and Content Assist
SVH provides powerful autocompletion capabilities. This means that the tool can help you complete identifiers and constructs as you are working on the code. Like other tools, it provides syntax-based autocompletion depending on the HDL language you’re using. However, it goes much further: it can also provide autocompletion based on the design context because it knows everything that has been declared in the design.
Autocompletion Interface
Autocompletion can come from different sources, as discussed in the following sections. However, the user interface to initiate it is always the same. SVH will suggest appropriate autocompletion options at any point as you enter code.

You can also trigger autocompletion suggestions by first placing your cursor where you want to autocomplete and then pressing Ctrl+Space.
Based on the Design Context
SVH uses its knowledge of designs to provide intelligent autocompletion that boosts your productivity tremendously.
The tool understands the current context, which identifiers are visible, and which constructs are legal at any given point in the code. As you start typing and ask for autocompletion, it will suggest appropriate identifiers as autocompletion candidates.
SVH provides autocomplete suggestions for:
- component declarations
- component instantiations
- entity instantiations
- module instantiations
- case statements (based on variables/signals with an enumeration type)
- SystemVerilog preprocessor/macro directives, e.g.,
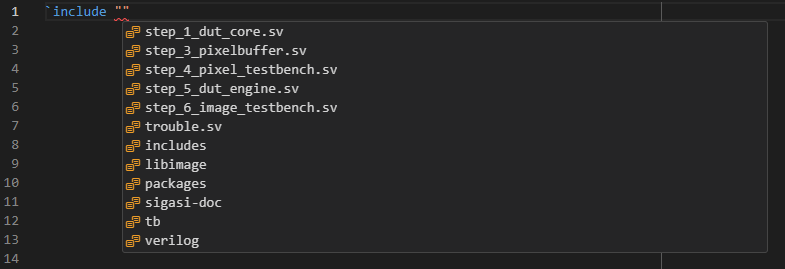
`defineor`ifndef - SystemVerilog include paths (
`include ""): triggering autocomplete between the double quotes will present a list of files and folders. If you select a folder, trigger autocomplete again to get completions in this folder.
Based on Templates
SVH can help you declare VHDL and SystemVerilog constructs, using autocomplete based on templates. SVH comes preconfigured with templates for all common declarations and statements, including (for VHDL):
- function, procedure
- process
- type: enum, file, range, array, record
- signal, constant, variable
- component
- entity
- architecture
- entity/architecture pair
- package/package body pair
- and much more
Some autocompletions are templates that require further user input. In such a case, the editor window will go into a special template editing mode after performing an autocomplete. Use TAB to go through the items that have to be modified or completed. When done, press ENTER to return to normal editing mode. The cursor will be placed at an appropriate position to continue working.
You can also configure your own templates as described in User-Defined Code Snippets.
Instantiating a Design Unit
Note: In other tools, this feature may be known as paste as instantiation or port translation.
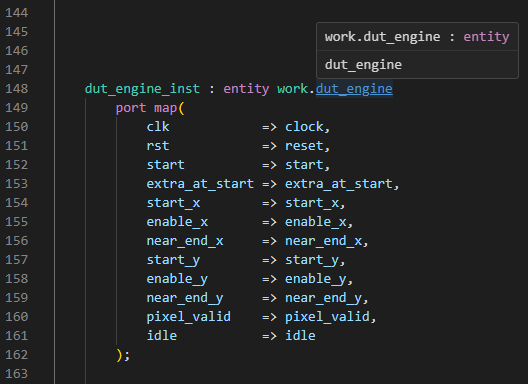
SVH knows all design units (entities, components, and modules) in a design and their ports and parameters or generic interfaces, and can therefore automate much of the instantiation process. At the point in the code where you normally enter a design unit’s name, use autocompletion instead to suggest a list of possible design units. Upon selection, the tool will complete the instantiation with a generic or parameter list, and a port list with named associations. As an initial suggestion, each actual parameter will have the same name as its formal parameter. Of course, the actual parameter names need to be reviewed and edited by the user. Therefore, the editor will go into template editing mode after the autocompletion.
Note that design units will only be shown if they are visible in the current scope.

A number of VHDL-specific and Verilog and SystemVerilog-specific autocompletes are available in SVH.
Signature Helper
When you invoke a function in VHDL or Verilog, SVH will list that function’s arguments in a pop-up window that will appear once you type an open parenthesis.
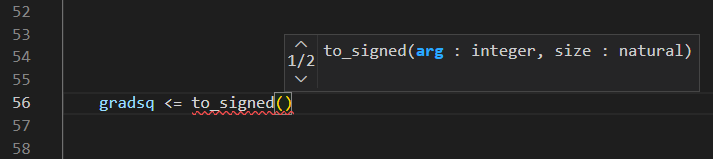
The Signature Helper also activates when instantiating a VHDL entity or a Verilog module by listing the ports or generics of that entity or module.
Smart Indentation
When you press enter, SVH automatically adjusts the indentation of
the current and the new line. Depending on the content of the preceding
line, SVH will automatically increase or decrease the indentation
level. For example, it may add an extra indent after a module or an entity and remove an indent for
the matching endmodule or end entity.
See also:
Code Formatting
Automated consistent code formatting makes code more readable and understandable for developers, whether working on their own code or when cooperating with colleagues. In order to format your code, right-click in the editor and select Format Document.


Read more in the VHDL code formatting and Verilog and SystemVerilog code formatting sections.
Rename Refactoring
Right-click on any identifier (VHDL or SystemVerilog) and select Rename Symbol to change the name of the associated declaration and all its references. Once you select Rename Symbol a little dialog box will pop up.
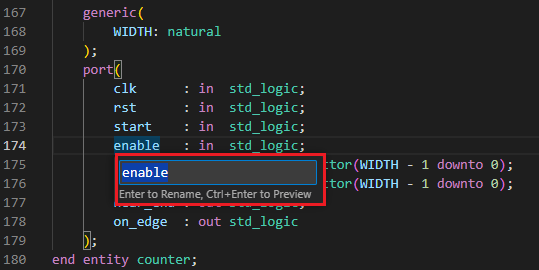
At this point, you can type the new name and press ENTER. This will rename the declaration of that symbol and all its references. Before renaming, you can also press CTRL+ENTER to see a preview before making changes across your files.
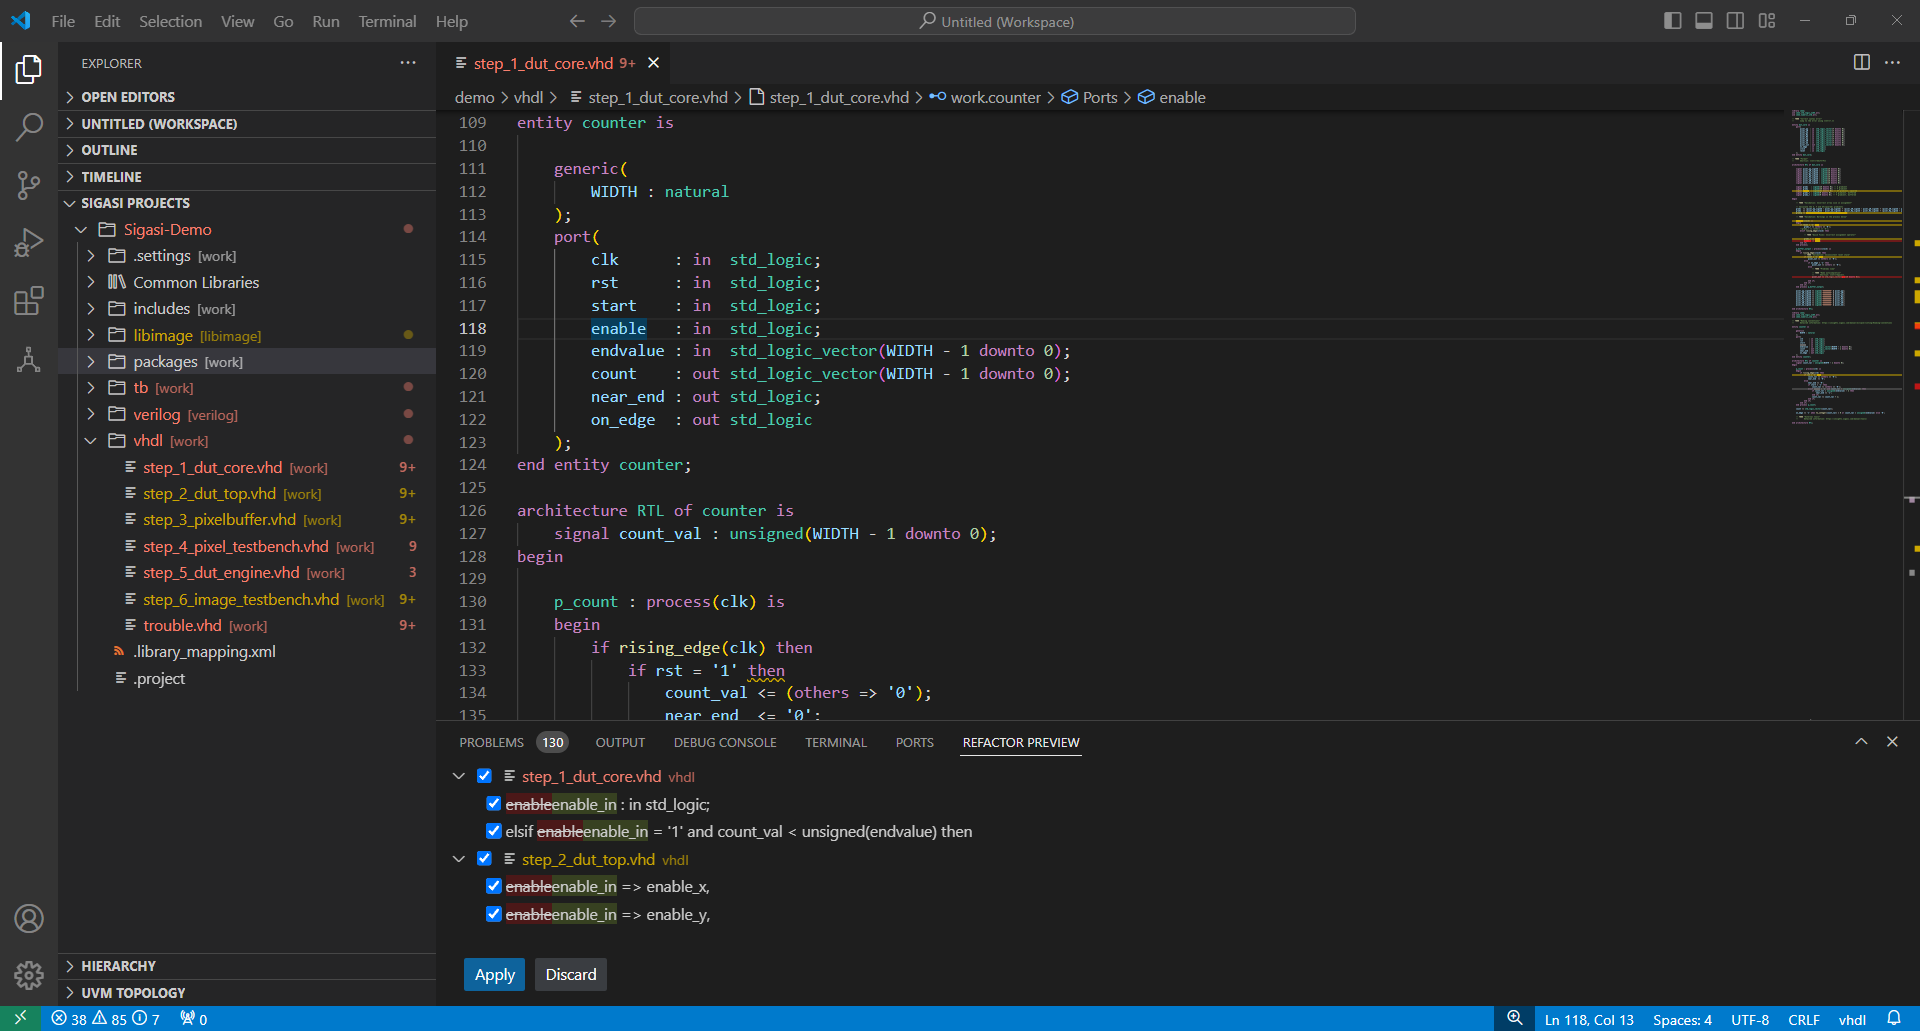
At the bottom, a Refactor Preview tab appears and lists the summary of the changes to be made. Clickig any of the items in the list visualizes all changes side-by-side.
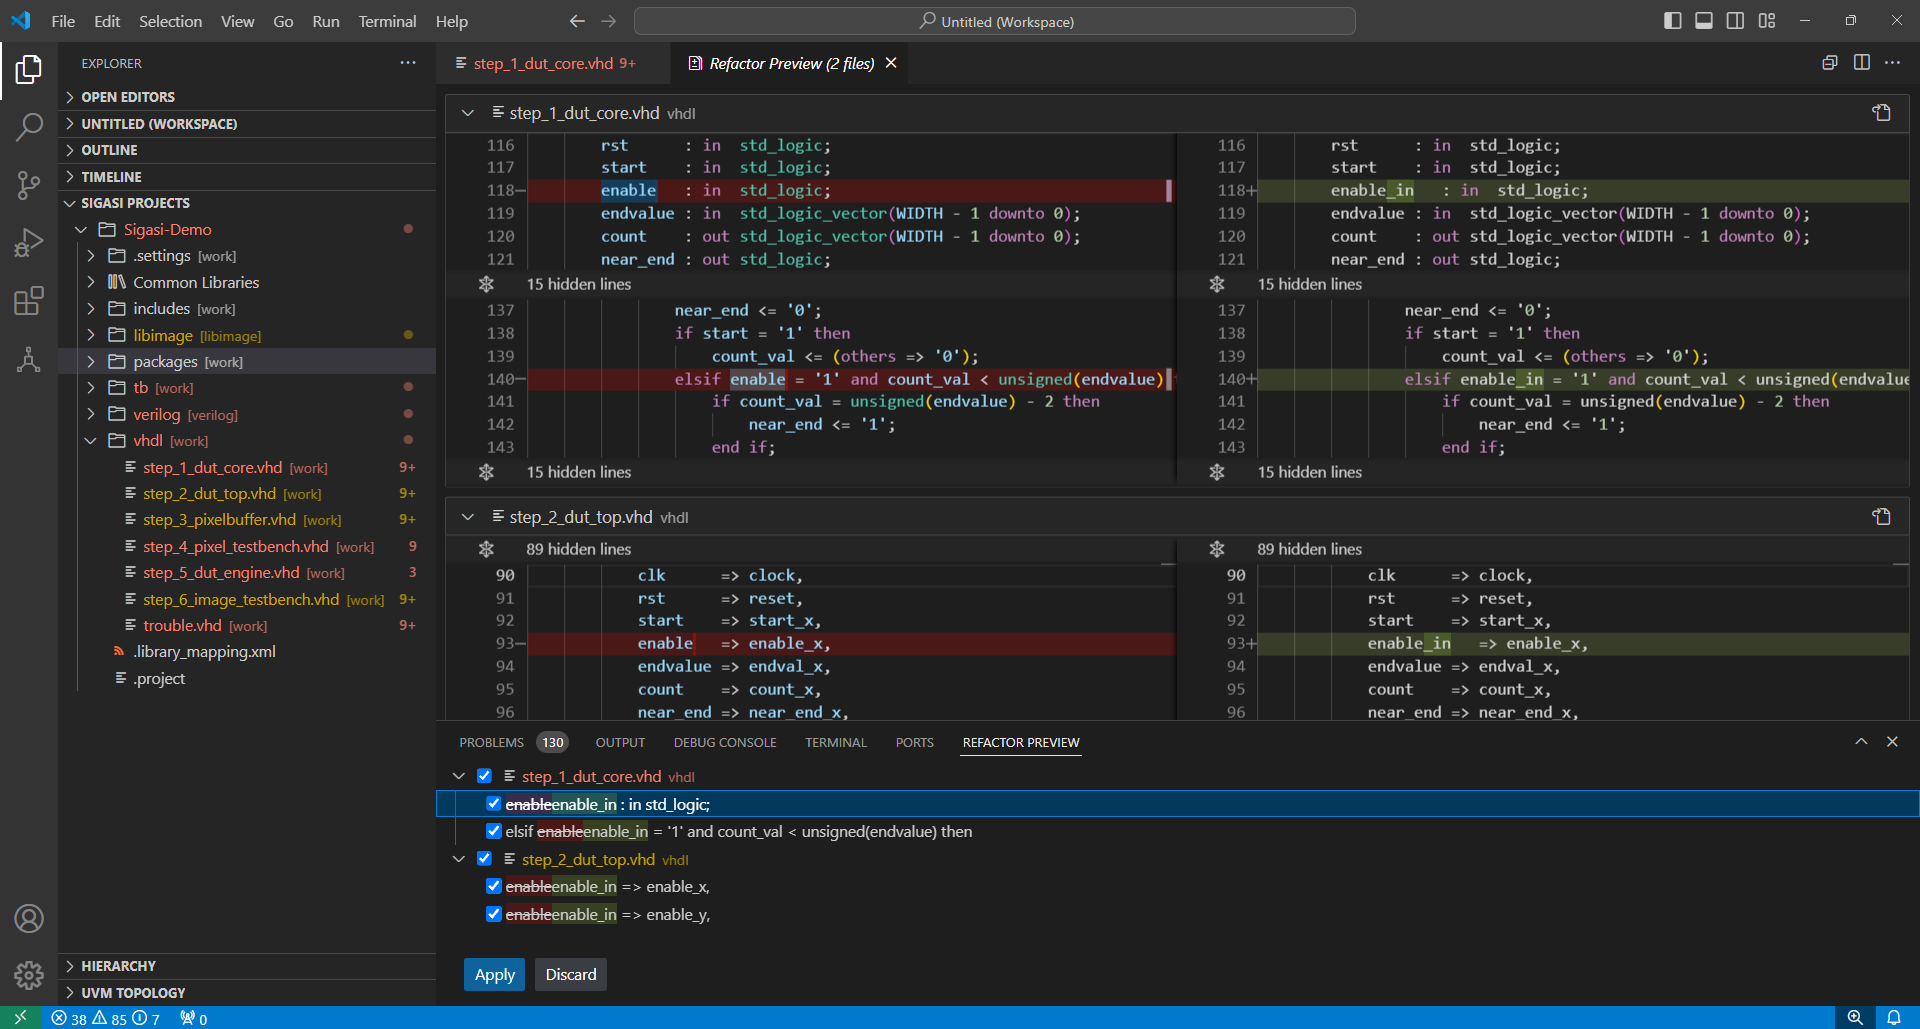
You can then click the APPLY button to accept the changes or click the DISCARD button to cancel the renaming action. Note that this feature does not rename references in comments.
User-Defined Code Snippets
VS Code supports user-defined code snippets, as explained here . To add snippets yourself, follow the steps below.
- Open the Command Palette (Ctrl+Shift+P) and type Snippets.
- Select Snippets: Configure User Snippets.
- Type vhdl or systemverilog to open the corresponding JSON file where you can add your snippet. See the examples below.
VHDL Snippet Example
{
    // Place your snippets for VHDL here.
    "package declaration": {
        "prefix": "package",
        "body": [
            "package ${1:name} is",
            "\t$0",
            "end package $1;"
        ],
        "description": "Insert package declaration"
    }
}
SystemVerilog Snippet Example
{
    // Place your snippets for Verilog and SystemVerilog here.
    "always posedge clk": {
        "prefix": "always",
        "body": [
            "always @(posedge ${1:clk}) begin",
            "\t$0",
            "end"
        ],
        "description": "Insert an always block with posedge clock"
    }
}
Other Editor Features
Code Folding
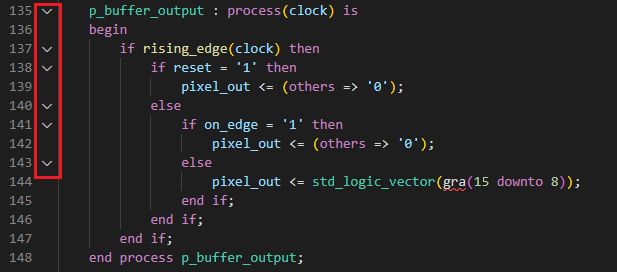
If you work with large files, you might want to hide certain pieces of your code. This can be done with code folding. Certain constructs, such as if-statements or process-statements, can be folded so that they are displayed as a single line in the editor view. You can do this by clicking the little arrow symbols next to the statement or declaration.
Add Parentheses or Create a String
If you select a region and press ( or [, the tool will enclose the selected region with the matching closing parenthesis, ) or ].
If you select a region and press ( or [, the tool will enclose the selected region with the matching closing parenthesis, ) or ].
This works for both regular and multi-line strings and with either single or double quotation marks.
You can configure this feature with the key editor.autoClosingQuotes.
Indentation and Whitespace
You can access the spaces customization controls at the bottom-right of the VS Code window.

If you click Spaces, a dialog box appears at the top-middle of the window.
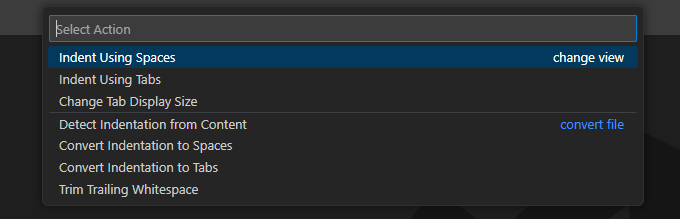
The options in this menu are only valid for the file in the editor. Before using these actions, make sure your file has been saved.
Split Editor
The VS Code editor can be split into independent viewports that access the same file buffer. To split the editor, go to View > Editor Layout and select the desired action.
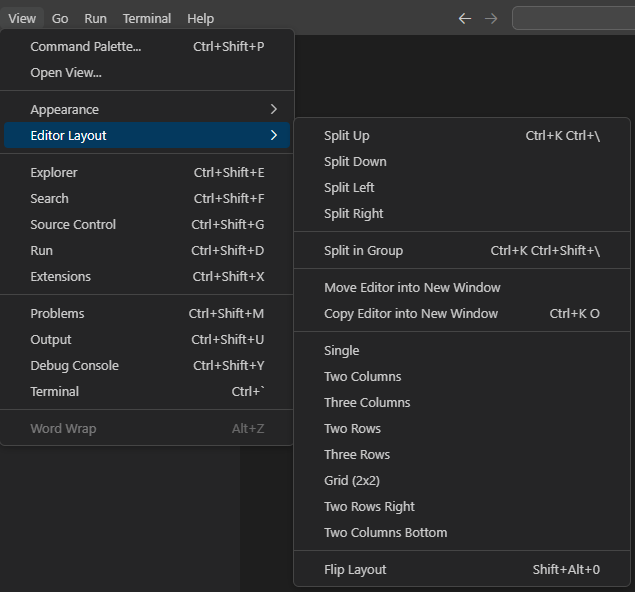
There can be more than two horizontal or vertical splits within an editor.
Sticky Scroll
You can use sticky scroll to navigate through your HDL code more easily. The stickiness is based on the code folding regions.
You can configure this feature with the key editor.stickyScroll.enabled.
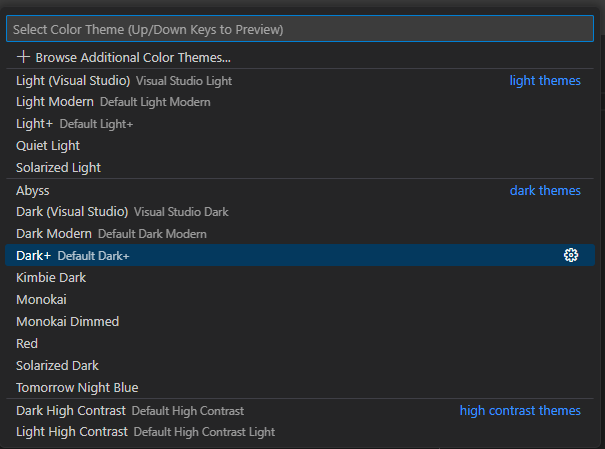
Customize Color Preferences
You can customize color preferences in SVH. Open the Command Palette via Ctrl+Shift+P, type color, and select Preferences: Color Theme from the list. You will get a list of themes from which to choose.
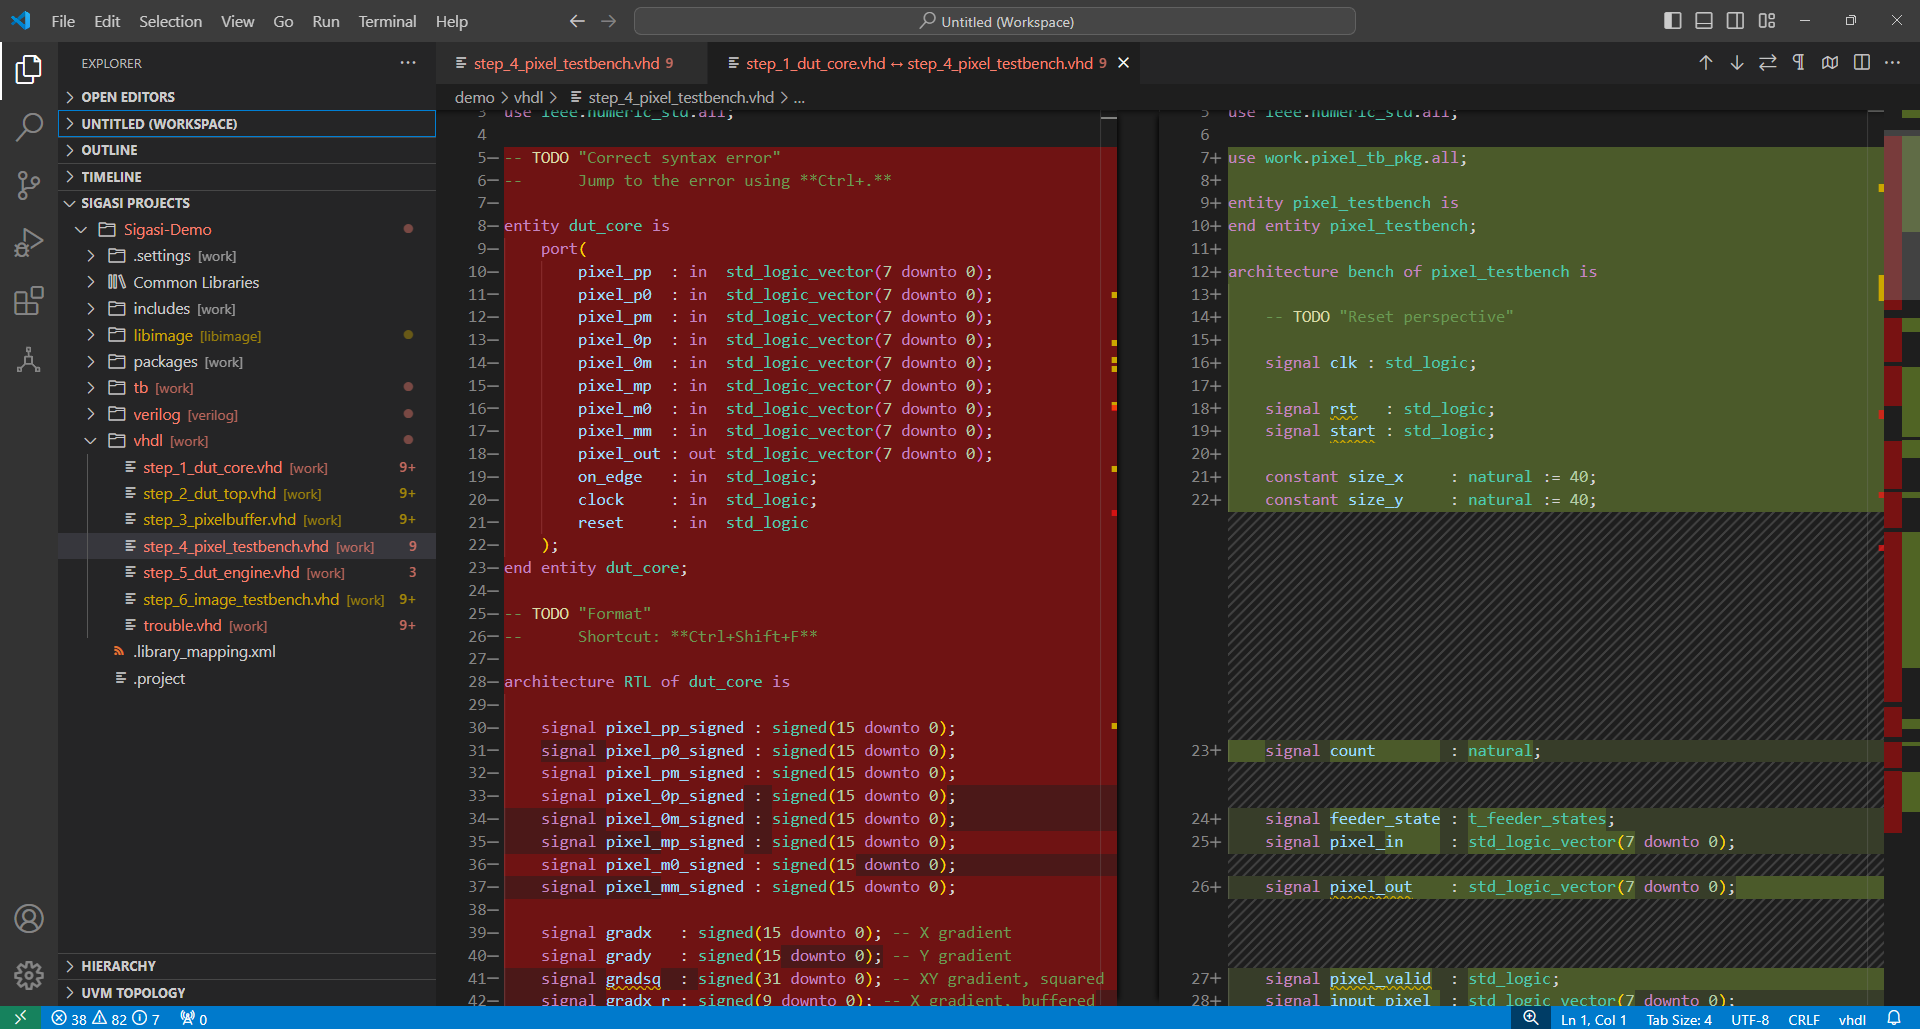
Side-By-Side Comparison
With SVH, you can compare two files side-by-side.
- Previous versions (local history or version control)
- Comparing two files
Multi-Cursor Support
In order to enable multi-cursor support, open the Command Palette via Ctrl+Shift+P, type multi, and select Toggle Multi-Cursor Modifier from the list.
Open Design Unit
In order to open a design unit in your project, press Ctrl+P, filter the list by typing, and select the design unit that you want to open from the list.

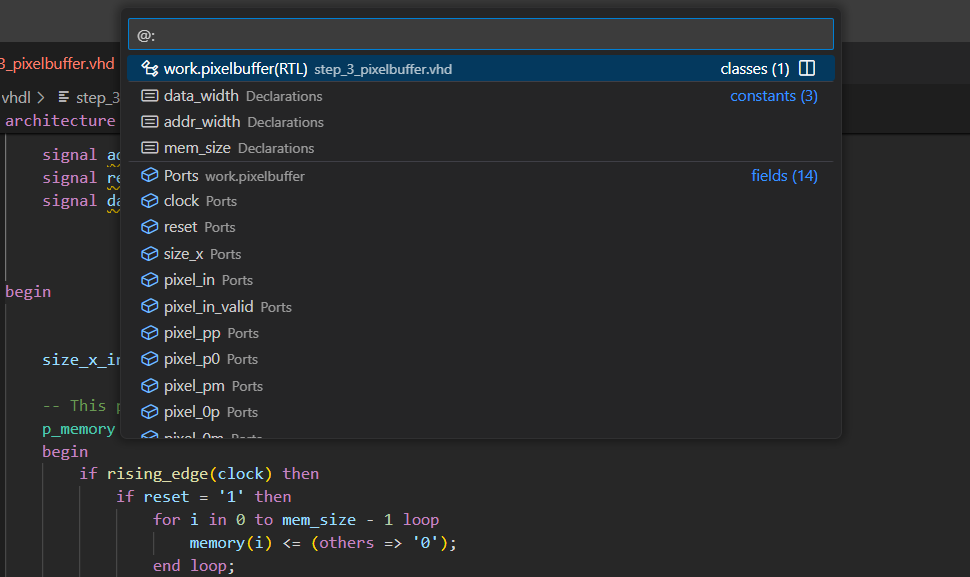
Quick Outline
For a quick outline of the objects in a file in the editor, press Ctrl+P, and type @. You can also type : when opening the Quick Outline to group the items by category.
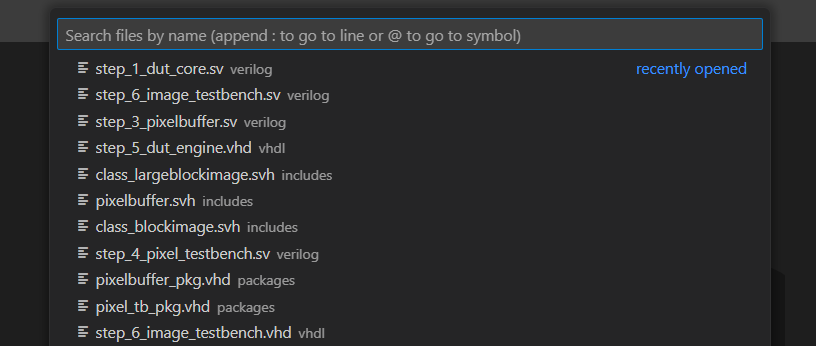
Open Resource (Go To File)
In order to open a resource, press Ctrl+P, filter the list by typing, and select the resource that you want to open from the list.
VHDL Specific
In addition to the powerful features of the VS Code editor, the SVH VHDL editor supports a number of advanced editing features that are specifically useful for VHDL editing. These are described below.
Code Highlighting
Highlighting classes for VHDL:
- Syntax: Comment, Keyword, Number, String, Task Tag
- Semantic: Constant, Port, Signal, Type, Variable, Attribute, Function, Procedure, Labels
VHDL Specific Autocompletes
Declaring a Component
If you want to create an instantiation based on a component (as opposed to a direct entity instantiation), you need to associate an entity with a component. SVH can automatically declare a component for an existing entity. In the place where you would normally enter the component name, use autocomplete instead to show the list of available entities. Upon selection, the tool will automatically complete the component declaration.
Autocomplete suggestions automatically appear and are updated as you type.
Type Conversion
In VHDL design, you need to do a lot of type conversions, and SVH’s
autocomplete functionality can help you here. Put a period (.)
after the element you want to convert and the autocomplete suggestions
will appear with descriptions like convert type.
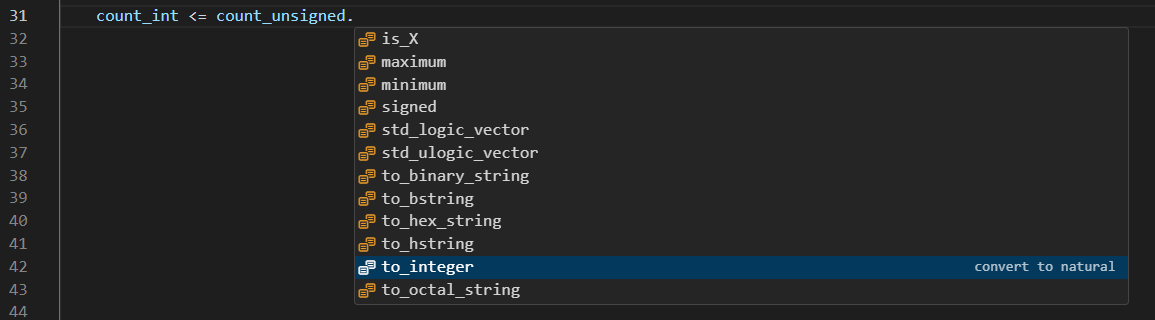
Once you select the desired conversion function, SVH will insert the code.

VHDL Code Formatting
Right-click in the editor and select Format Document to format your current VHDL file.
This includes:
- indentation
- spacing between keywords and references
- vertically aligning symbols like
<= - keyword casing
- comment alignment
Context-Based
SVH’s formatter is context-based and tries to respect the author’s style. So depending on your source style, the formatter might make different choices.
One example of this is the decision to format a conditional signal assignment on one or more lines. SVH decides based on the position of the first else keyword.
If you put the else keyword on the first line, the formatter will keep everything on one line. If you put the else keyword on a new line, the formatter will use multiple lines for the assignment.
  demo <= (others => '0') when enable = '1'
     else (others => '1') when input  = '1' -- else on new line
     else (others => 'X');
Note about broken code: If your VHDL source file contains syntactical errors, the formatter cannot always figure out appropriate formatting. For this reason, the formatter is programmed to stop applying (whitespace) changes beyond unsupported syntax errors.
Configuration
In order to set your formatting preferences, right-click the project name in the Sigasi Projects View and select Open Preference View. Then click VHDL Formatting and enable project formatting settings.

- Preserve newlines: this option configures the formatter to not add or remove any newlines in your code.
- Vertical alignment: this option configures the formatter to vertically align consecutive declarations and statements, for example
<=or:. - Lowercase/Uppercase keywords: when this option is set to
UPPERCASEthe formatter will convert all VHDL keywords to uppercase. When this option is set tolowercase, the keywords will be converted to lowercase. When this option is set toignore, the case of keywords won’t be changed by the formatter.
Note: A Sigasi Visual HDL Designer Edition license is required for this option. - Alignment column for trailing comments: this setting configures what column SVH aligns trailing comments to. The default is 40, but you can choose 0 to not align trailing comments.
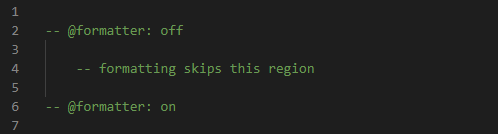
Disable Formatting in Defined Regions
You can disable the formatter for defined regions in your VHDL source files by adding off and on tags:
- off tag:
-- @formatter:off- Turns off the formatter until the end of the file or until an on tag is encountered
- on tag:
-- @formatter:on- Reenables the formatter following an off tag
Format on Save
You can use auto-formatting whenever you save a file. This feature can be enabled with the key editor.formatOnSave.
Constant Propagation
SVH propagates the values of VHDL constants to the expressions where they are used.

VHDL 2019 Tool Directives
VHDL 2019 tool directives are a simplified version of the preprocessor found in SystemVerilog or the C-family of languages. Tool directives allow for conditionally enabling code based on tool type, debug mode, or any other custom variable.
In order to edit VHDL tool directives, right-click the project name in the Sigasi Projects View and select Open Preference View. Then click VHDL Conditional Variables.
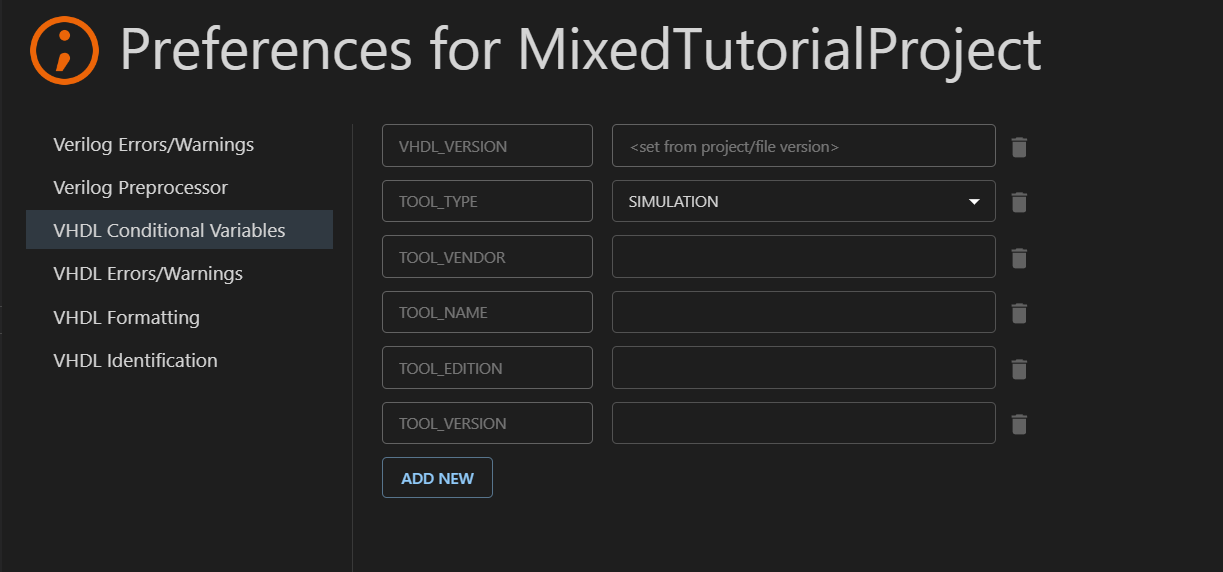
Note that some keys are hardcoded as required by the VHDL Language Reference Manual.
VHDL Version
To configure the VHDL version, right-click the project name in the Sigasi Projects View and select Set Language Version. In the dialog box, select Set VHDL version and then select the desired VHDL version.
The VHDL version can also be set at the folder and file level, but changing the version at the project level will override all folder and file level settings. Also note that the VHDL version of a folder or file must be greater or equal to the VHDL version of the project.
Stuttering
Stuttering is an editing technique popularized by Emacs that lets you
type certain things really fast. You activate it by tapping a certain
key twice which will expand it to something more complex. For example, press
the period key . twice, and the editor will expand it to a right
arrow =>. Stuttering works like double-clicking: if you type keys
slowly, the stuttering mechanism will not be triggered.
The following stuttering keys are available:
| Keys | Effect |
|---|---|
| ,, | <= |
| .. | => |
| ;; | := |
Stuttering is enabled by default but can be toggled using the configuration option Enable stuttering with the key sigasi.vhdl.stuttering.
Verilog and SystemVerilog Specific
In addition to the powerful features of the VS Code editor, the included SVH Verilog and SystemVerilog editor supports a number of advanced editing features that are specifically useful for SystemVerilog editing. These are described below. Currently, SVH supports Verilog 2005 (IEEE 1364-2005) and SystemVerilog 2017 (IEEE 1800-2017).
Code Highlighting
Highlighting classes for Verilog and SystemVerilog:
- Syntax: Comment, Keyword, Number, String, Task Tag, Operator
- Semantic: Assignment, Class, Covergroup, Macro, Enum, Function, Localparam, Module, Net, Wire, Parameter, Port, Type
Verilog and SystemVerilog Specific Autocompletes
Inserting an Include File
Making a typo in the file name of an `include causes swarms of errors. To prevent this, you can simply press Ctrl+Space
between the double quotation marks of an include directive. You’ll be presented with all the files reachable from
your current include path.
Verilog and SystemVerilog Code Formatting
Right-click in the editor and select Format Document to format your current Verilog or SystemVerilog file. The default formatter implementation corrects indentation only.
Verilog Version
You can choose whether *.v files are treated as Verilog (IEEE 1364-2005) or SystemVerilog (IEEE 1800-2017). *.sv files are always treated as SystemVerilog. To configure the Verilog version, right-click the project name in the Sigasi Projects View and select Set Language Version. In the dialog box, select Set Verilog version.
Include Paths and Initial Preprocessor Definitions
Sigasi attempts to resolve missing Include Paths automatically. However, we highly recommend you explicitly configure include paths to ensure the order is accurate. You can configure include paths on the Verilog Preprocessor page. Right-click the project name in the Sigasi Projects View and select Verilog Preprocessor.
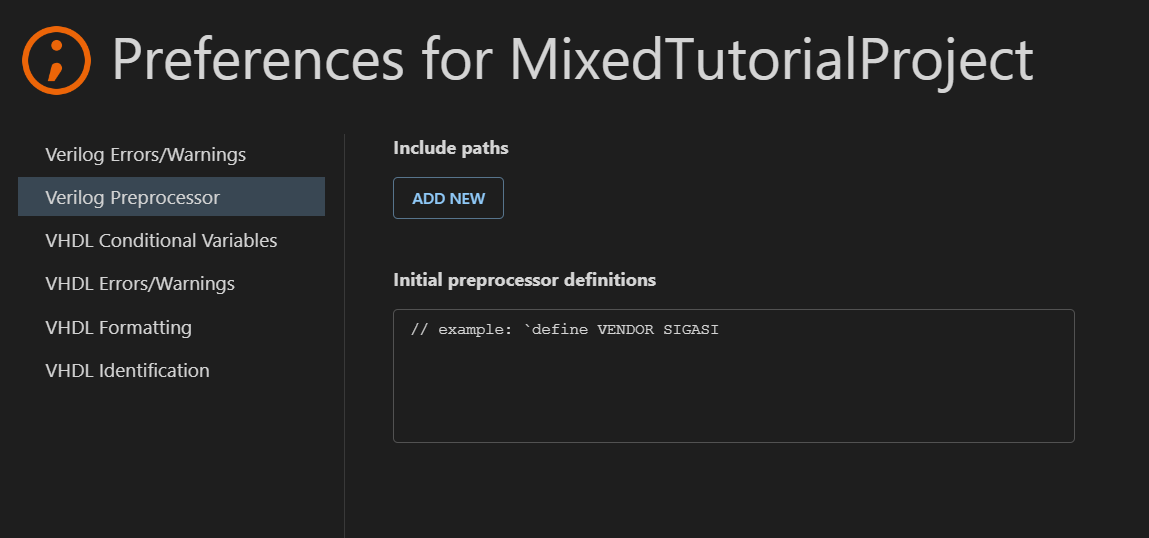
Here you can set include paths. In the Initial preprocessor definitions field, you can configure definitions to be set before other files in the project are processed.
This allows you, for example, to set global defines without an explicit include statement.
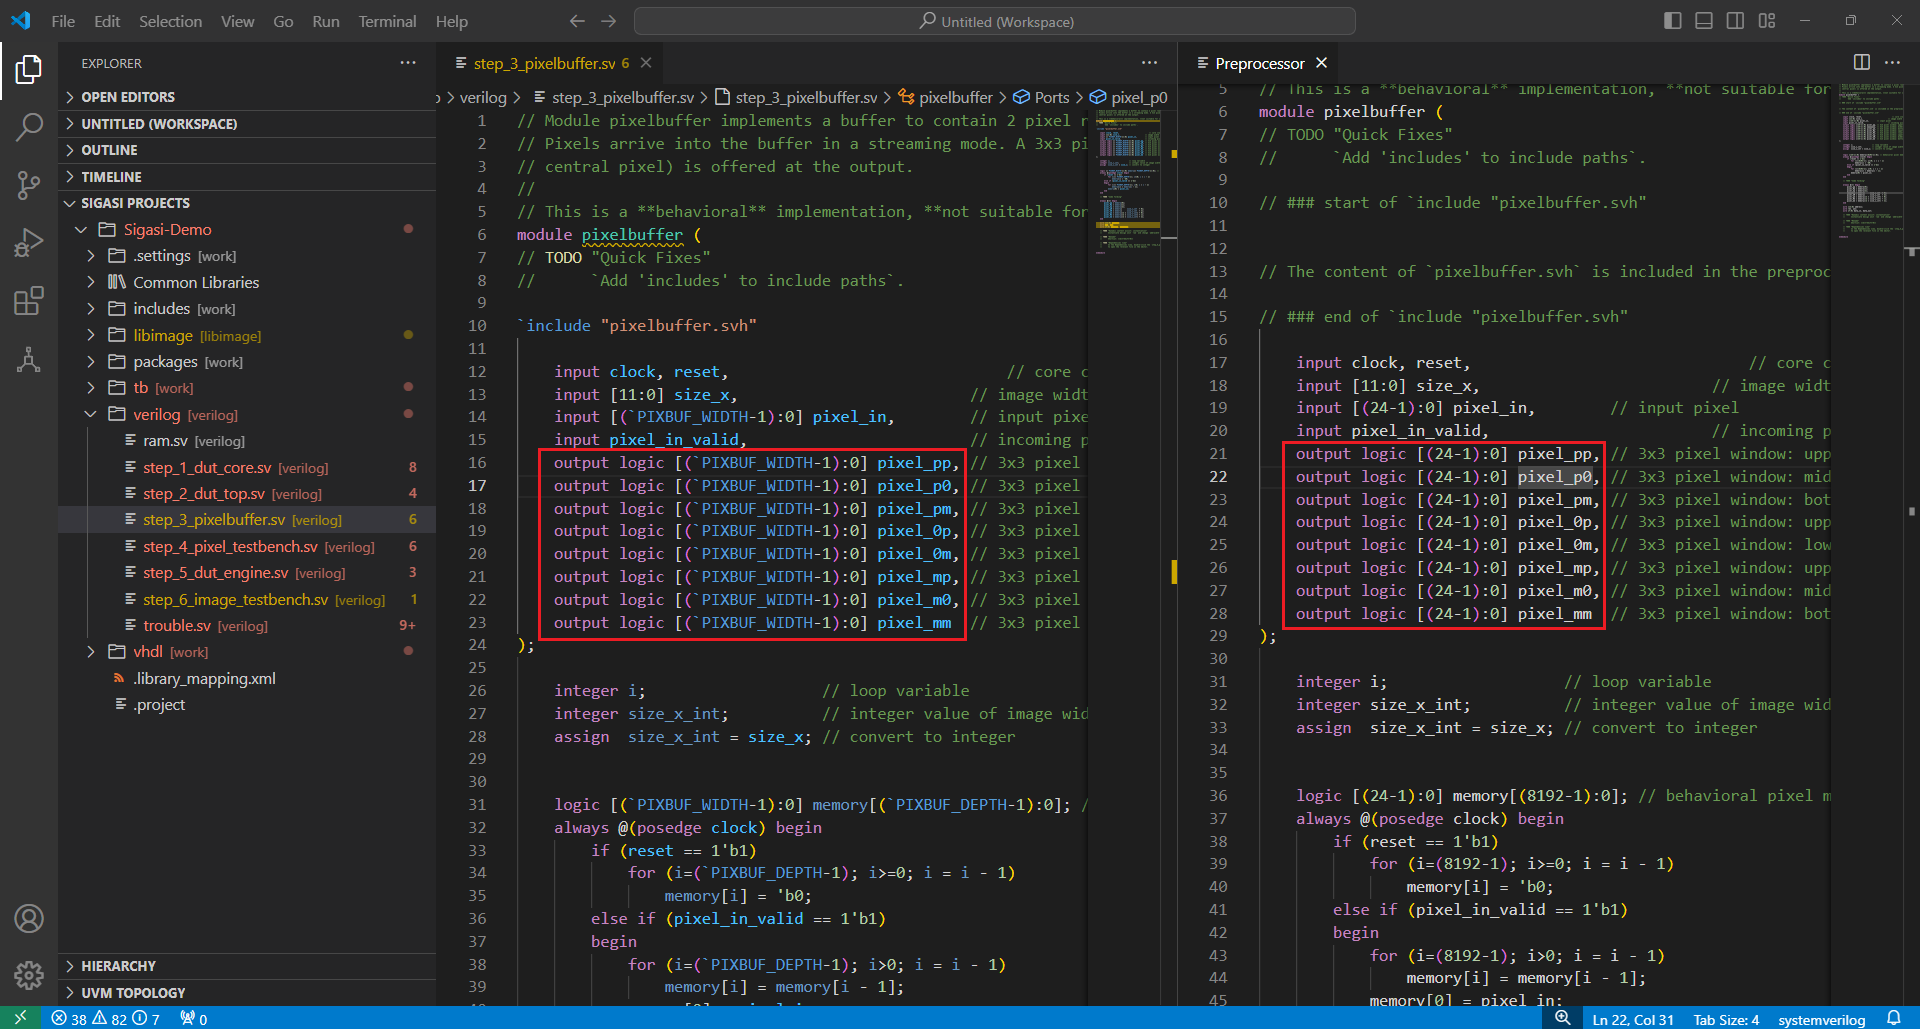
Preprocessor
When you hover over a SystemVerilog preprocessor directive (e.g. include ...), SVH shows the preprocessed text.

In the Preprocessor View, you can preview the expanded version of your preprocessed SystemVerilog source files. In order to open the Preprocessor View, right-click in the editor and select Show In > Preprocessor.