Sigasi Studio supports a number of ways to work with external tools such as simulators. Different techniques offer varying degrees of flexibility and automation.
Most people will want to set up their external compilers so that Sigasi Studio can use them to compile and start simulations.
Another way to compile your project is to export your project to a CSV (comma separated values) list of all the files in your project, in the correct compilation order. Learn more about how to export your project’s file list.
The third, and more advanced way of working with compilers or simulators is to use the standard Eclipse mechanisms of builders and external tools.
By creating a builder, you can arrange for an external tool to be run automatically when a Sigasi Studio project is rebuilt. By default, this happens each time you save a file. External Tools Configuration allow you to call any program or script from within the Sigasi Studio GUI. You have to write and maintain the scripts yourself, but you have complete flexibility as to what is in the scripts.
External Compilers
If you have a simulator or lint tool installed, you can use this for two purposes:
- Save-time Compilation: Compile and check your files each time you save. Any errors or warnings will show up in the file, on the line number of the problrem
- Launch Simulator: Start the simulator in its own window, ready to run a simulation.
Learn about which external compilers are supported and how to Configure external compiler.
Launch simulator
If an external compiler is enabled, you can also start a simulation from
Sigasi Studio. You can start a simulation by first selecting your top level
in the Hierarchy View. Next click the
Simulate button ![]() in the hierarchy
view to launch the simulator gui with an elaborated design ready for
simulation. Sigasi Studio opens a new console for each simulation launch. You
can terminate a simulation by clicking the Stop icon
in the hierarchy
view to launch the simulator gui with an elaborated design ready for
simulation. Sigasi Studio opens a new console for each simulation launch. You
can terminate a simulation by clicking the Stop icon
![]() .
.
When you launch a simulation, Sigasi Studio opens a new console in the Console View
You can switch between different consoles by clicking the ![]() icon.
icon.

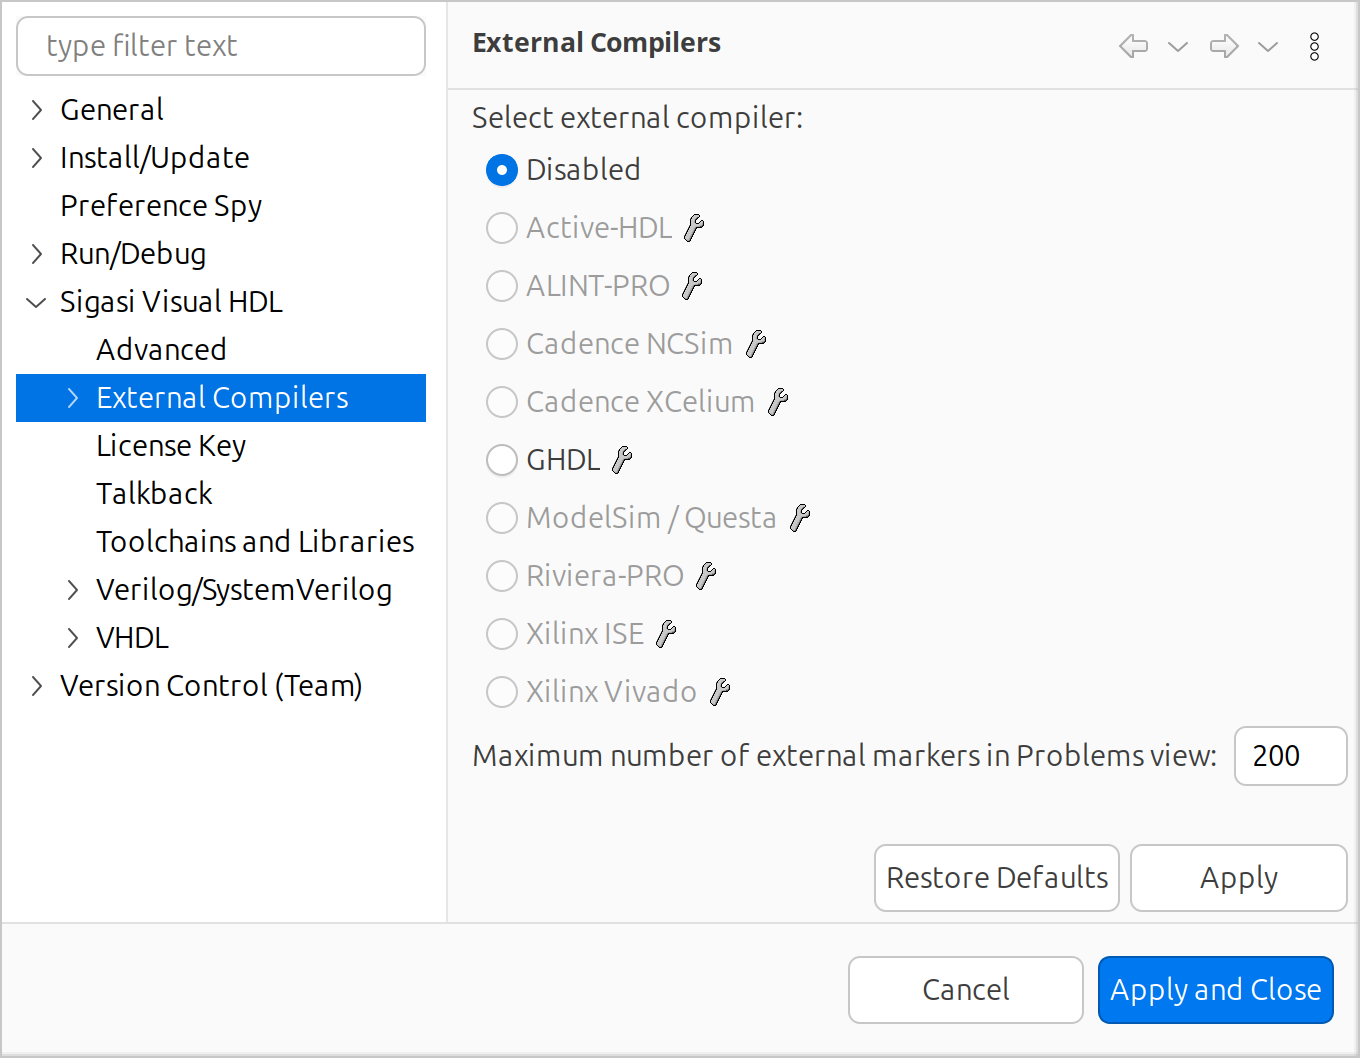
Configure external compiler
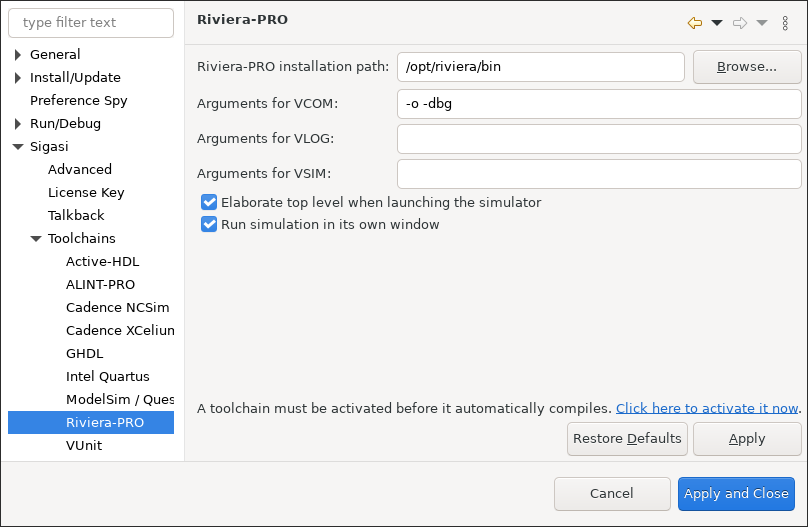
You can configure the external compiler settings by clicking Window > Preferences > Sigasi > Toolchains. There is a subpage for each supported toolchain, which you can find in the page tree on the left or by clicking on the wrench icon. Before you can enable a toolchain on the main page, you must specify its installation path on its subpage. Clicking Restore Defaults on a toolchain subpage will automatically fill in the installation path if your toolchain is installed on a default location. After you press Apply, you can select your toolchain on the Sigasi > Toolchains page.
For some toolchains you can specify extra command line arguments. Note that these preference pages support Eclipse Variables which allow you to more easily share settings in a team.
Environment variables are supported too.
If you want to use the $HOME environment variable, you can call this variable by typing ${env_var:HOME}.
List of toolchains
By “toolchains”, we mean any tool or set of tools that processes VHDL or Verilog code, and that is supported by Sigasi Studio. At this time, external compiler include simulators and lint tools, but in the future it could also include synthesis tools.
For each toolchain Sigasi Studio can support any combination of the following:
- Save-time compilation
- Launch Simulator
- Quick Fix for third party libraries
- Open a Quartus Project in Sigasi Studio
Currently the following external compilers are supported:
| Toolchain | save-time compilation | start simulation |
|---|---|---|
| Aldec Riviera-PRO | true | true |
| Aldec Active-HDL | true | false |
| Aldec ALINT-PRO | true | false |
| Intel Quartus | false | false |
| ModelSim / QuestaSim | true | true |
| AMD/Xilinx ISE | true | true |
| AMD/Xilinx Vivado | true | true |
| Cadence Incisive | true | false |
| Cadence XCelium | true | false |
| GHDL | true | true |
Note: OneSpin was supported in Sigasi Studio from version 3.1 to 4.17 and provided save-time compilation and running of elaboration checks.
Notes
- For information on where to obtain free HDL simulators, see this section in our FAQ.
- GHDL does not support project dependencies.
Save-time compilation
Sigasi Studio can use an external VHDL or Verilog compiler for additional code validation. At this time, Sigasi Studio supports:
vcom/vlog/vsimstyle compilers. These compilers include Aldec Riviera-PRO and from Mentor Graphics ModelSim and QuestaSim.isimcompiler from AMD/Xilinx.ncsim/xmsimcompiler from Cadence Incisive/XCelium.
Catching bugs earlier is cheaper than catching them late. Traditionally, the first errors are found when the hardware designer decides to run a simulation. At this time, the simulator’s compiler tool will detect errors and fail. At Sigasi we think that this is too late. Problems should be detected as soon as possible.
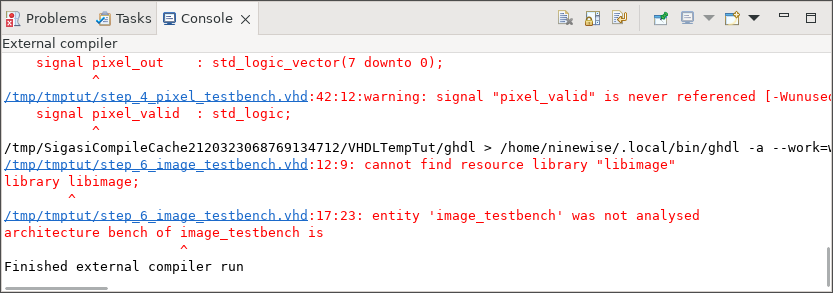
Sigasi Studio adds two extra layers of error detection to catch problems earlier. First, there is the type-time error detector. As soon as the designer writes an error, it is marked in the text much like a spell checker in a word processor. Second, as soon as you save a file, Sigasi Studio calls the external compiler for further analysis. All errors that the external compiler finds are marked inside your file, so that you can find and fix them easily. Sigasi Studio intelligently controls the external compiler incrementally and only recompiles design files that need recompilation.
All output from external compilers is logged in Sigasi Studio’s console view for your convenience. Paths to your design files are automatically converted to hyperlinks to ease navigation.
The table below lists some examples of VHDL errors that are detected in Sigasi Studio at type time, at save time and with the external compiler integration.
| Check | Type time | Save time | Save time compile |
|---|---|---|---|
| Syntax errors | yes | yes | yes |
| Undeclared signals | yes | yes | yes |
| Multiple files | no | yes | yes |
| Data type mismatch | no | no | yes |
| Multiple drivers | no | no | yes |
Libraries
Libraries are fully supported. But note that Sigasi Studio does not send Common Libraries to the external compiler for compilation. These libraries are expected to be pre-compiled. Contact support@sigasi.com if you want to add more libraries to this list.
If your project root contains a modelsim.ini file, Sigasi Studio will add this
file to the vcom command with -modelsimini. This allows you to
configure custom settings for Mentor’s vcom.
External Tools Configuration
Select Run > External tools > External Tools Configurations to get
started, or use the ![]() icon.
icon.
To create a new configuration, first select
![]() Program, then click
Program, then click
![]() .
.
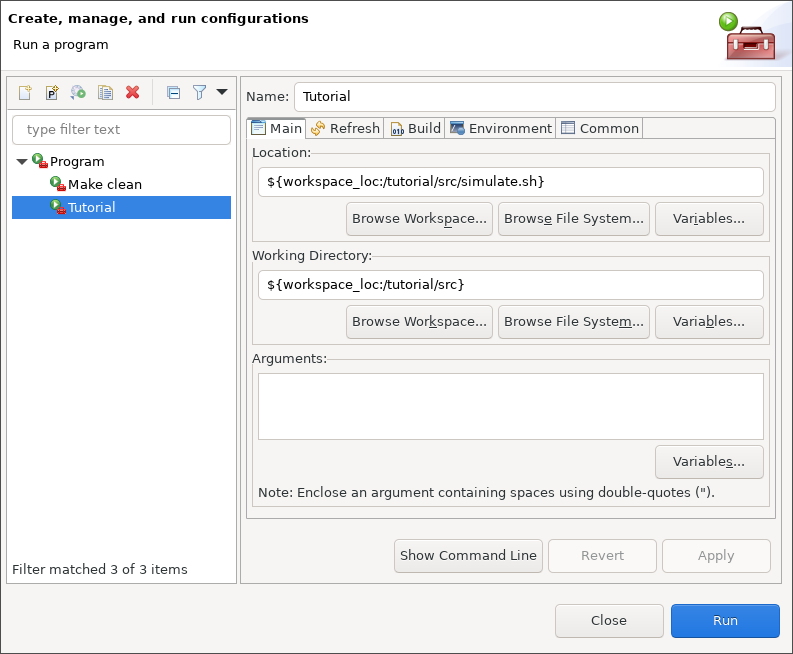
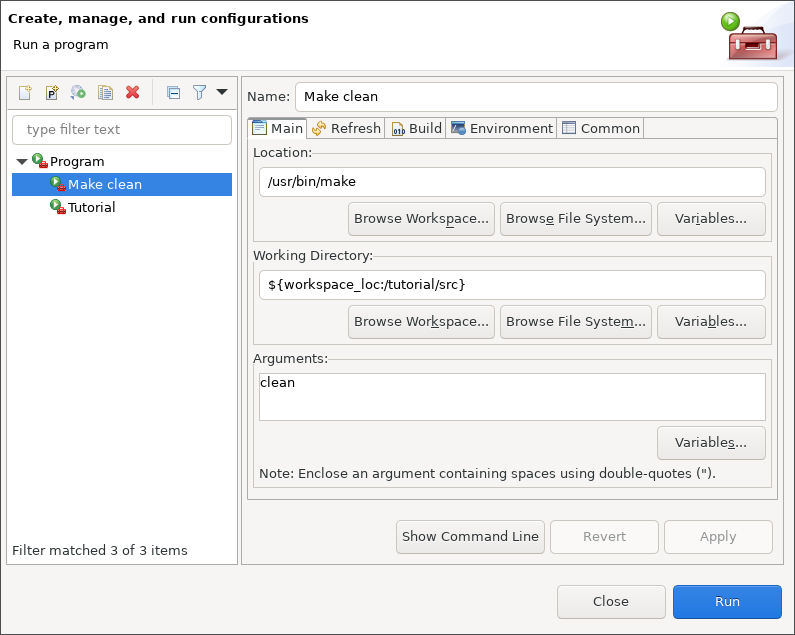
Enter all necessary information to start your external tool:
- Name: The name for this configuration.
- Location: The location of the executable. You can browse for programs and scripts in your workspace or programs on your file system.
- Working Directory: The working directory for your program.
- Arguments: The arguments, if any, to your program.
You can test your tool configuration with the Run button.
The following example screenshot shows how to set up configuration to
run a simulate.sh script from within Sigasi Studio.
The following example screenshot shows how to set up a configuration to
run make clean on a Linux machine.
To run the external tool just select the configuration from the dropdown
menu on the ![]() -icon. You can rerun the
last configuration by simply clicking
-icon. You can rerun the
last configuration by simply clicking
![]() .
.
Variables in Arguments
In the arguments field, you can use variables , which are automatically expanded when the external tool is run.
This allows you to do things like adding the currently selected file in the file explorer as an argument for an external tool configuration through ${resource_path}.
Sigasi Studio adds the following variables and parameters for VHDL and (System)Verilog projects:
| Variable Name | Description |
|---|---|
${library:<argument>} | Get the library name of <argument>. For example, to the get the library of the currently selected resource use ${library:${resource_path}} |
${sigasi_toplevel} | Get the name of the current top level: library.name |
${sigasi_toplevel:alt} | Get the alternative name of the current top level, e.g. library.anEntity(RTL) rather than library.anEntity.RTL |
${sigasi_toplevel:short} | Get the name of the current top level without library: name |
${sigasi_toplevel:alt:short} | Get the alternative name of the current top level without library, e.g. anEntity(RTL) rather than anEntity.RTL |
${sigasi_toplevel:project_path} | Get the path of the current top level’s project root |
Creating a Builder
An external tool configuration as described in the previous section
makes it easy to run an external tool, but you still have to do so
explicitly. For some programs, such as the make utility, it makes
sense instead to do this automatically upon a change in your project.
This functionality can be accomplished by a builder. We will show how to
create a builder for a Modelsim Makefile as an example.
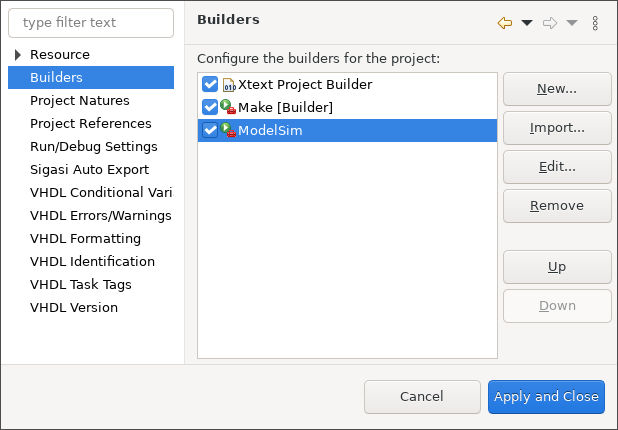
To create a builder, right-click your project and select Properties > Builders.
Click New… and the builder configuration window will pop-up:
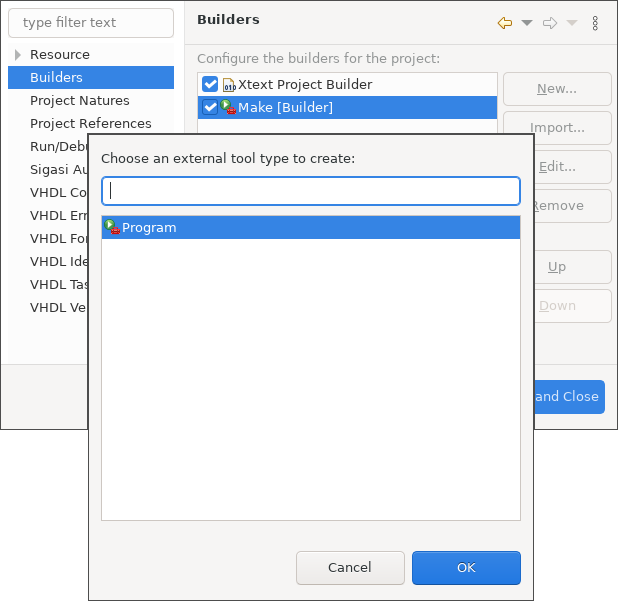
You will be asked to select a configuration type:
select ![]() Program.
Program.
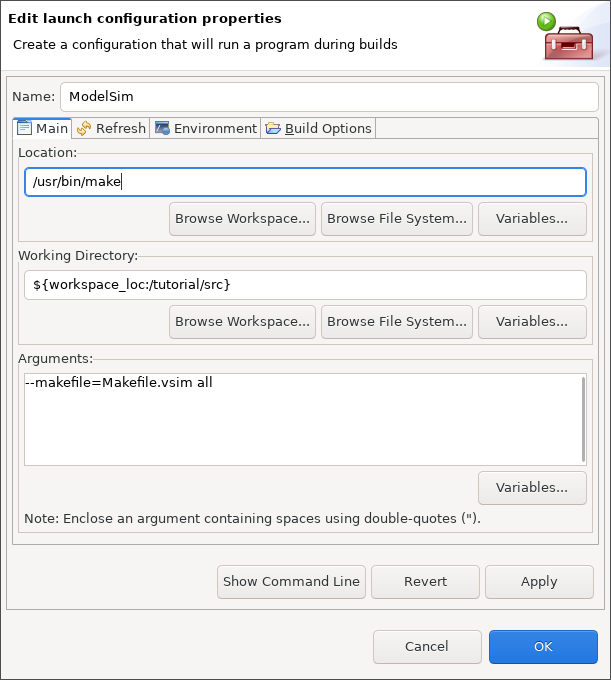
Next, configure the builder in a configuration window pop-up window:
- Name: The name of your builder, e.g.
ModelSim. - Location: The location of the program, e.g.
/usr/bin/make. - Working Directory: The working directory for your program. For example, click Browse Workspace… and select the root folder of your project.
- Arguments: The arguments to your program, e.g.
--makefile=Makefile.vsim all.
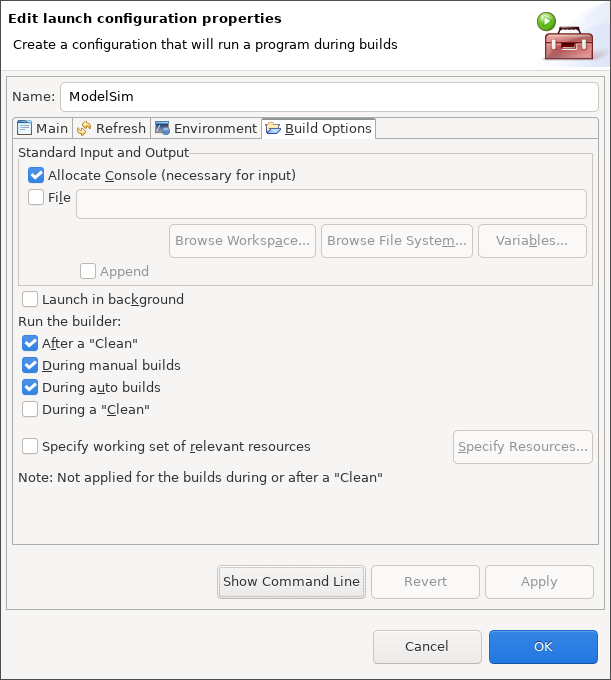
With the default settings the ModelSim Makefile will only be run during
a manual build or after a “Clean”. To make sure Sigasi Studio runs make
every time you save a change to a file, click the Build Options tab
and check the During auto builds checkbox.
After configuration, the new builder will appear in the builder list.
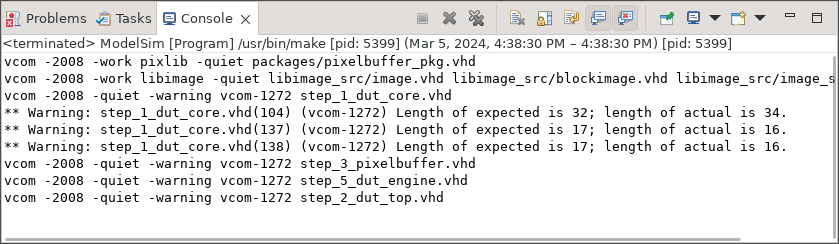
When you close the builder configuration dialog windows, the new builder will automatically be run. In our example of a Modelsim Makefile, Modelsim’s messages will appear in the console view.
You can add as many extra builders as you want. This can be useful for additional linting tools or code generators.
Intel Quartus integration
If you are using Intel Quartus 12.1 or higher, you can use Sigasi Studio as preferred HDL editor.
If you use the Sigasi Studio/Intel Quartus integration, you can easily open VHDL files by double clicking on them in Quartus. Sigasi Studio will be aware of the entire Quartus project, so that you can perform project-wide searches and navigation actions in Sigasi Studio. Furthermore, if you add or remove files in the Quartus project, these changes are automatically applied in Sigasi Studio.
Note: If you want to set up a project independent of Intel Quartus, please read the documentation on setting up a project.
Setting the preferred editor
While importing a Quartus Project in Sigasi Studio, you have the possibility to configure Sigasi Studio as preferred editor in Intel Quartus. This offers the ability to open files in Sigasi Studio from within Quartus.
Open a Quartus Project in Sigasi Studio
After you have configured Sigasi Studio to be the preferred editor in Quartus, you can open files by double clicking on them in Quartus.
Sigasi Studio will import entire Quartus project and your file will open in the Sigasi Studio editor view. If you make changes to your Quartus project (like adding or removing files), these changes are reflected in Sigasi Studio as well.
The first time you import your project, it may take a few minutes. After that, you can leave Sigasi Studio open and double-click other files in Quartus to open them in the Sigasi Studio editor view.
If your Quartus Project File (.QPF file) contains a reference to a
file that does not exist, Sigasi Studio will show an icon for that file with
the broken link icon ![]() .
.
Quartus Preferences
The first time you import a Quartus project, Sigasi Studio will ask for the Quartus installation location. Sigasi Studio needs this path to find the Quartus libraries. You can change the Quartus installation location by selecting Window > Preferences > Sigasi > Toolchains.
Add files to your Quartus project in Sigasi Studio
To add a file to your Quartus project, you can use the default New VHDL file wizard of Sigasi Studio (File > New > VHDL File).
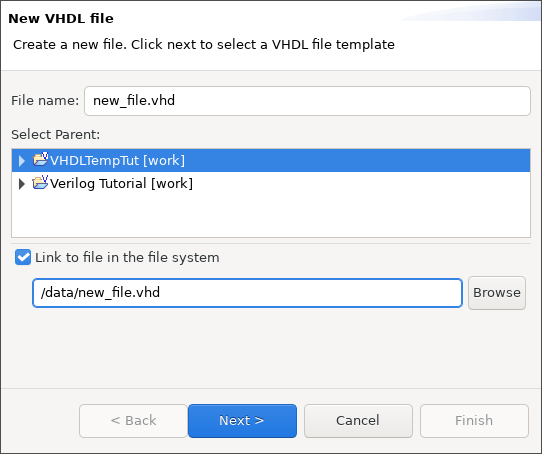
Note that Quartus does not automatically update its UI after you add files to your project. In order to update the files list, you should run a work flow action in Quartus, like starting a compilation.
AMD/Xilinx integration
Setting the preferred editor
To open the Sigasi Studio editor from AMD/Xilinx, you first have to configure Sigasi Studio as preferred editor in Vivado or ISE.
Importing AMD/Xilinx Projects in Sigasi Studio
Vivado
The process of importing a AMD/Xilinx Vivado project is explained in Generating a Sigasi project from a Vivado project.
ISE
The process of importing a AMD/Xilinx ISE project is explained in Importing a AMD/Xilinx ISE project in Sigasi.
AMD/Xilinx Preferences
Vivado
You can change the AMD/Xilinx Vivado installation location by selecting Window > Preferences > Sigasi > Toolchains > Xilinx Vivado. Sigasi Studio needs this path to find the AMD/Xilinx Vivado libraries.
ISE
You can change the AMD/Xilinx ISE installation location by selecting Window > Preferences > Sigasi > Toolchains > Xilinx ISE. Sigasi Studio needs this path to find the AMD/Xilinx ISE libraries and to run the ISim compiler and simulator.
Export
You can export a list of all HDL files in your project, sorted in the correct compilation order. You can use your own simple scripts to manipulate such list and run any EDA tool, including simulators, synthesis and linter tools.
To export a comma separated value (CSV) list of files in your project, right-click your project and select Export….
In the Sigasi category, select CSV File. Then select the project you want to export.
As a result, you get a file named compilation_order.csv, which lists the HDL files in your project in a valid compile order.
Example (for the tutorial project):
work, dut.vhd
work, clock_generator.vhd
work, testbench.vhd
This file will use relative paths, except when the file is on a different drive (on Windows).
Auto-export
You can also configure Sigasi Studio to auto-export this CSV file, every time the dependencies change.
Right click on the project you want to auto-export in the Project Explorer, and select Properties and Sigasi Auto Export.

If you do not set a fixed top level name (i.e. empty top level name in the property page), Sigasi Studio will use the current top level in the Hierarchy View as input. Note that this only works if the top level belongs to the selected project.
This information is stored in .settings/com.sigasi.hdt.shared.ui.prefs in your project.