Choosing your VHDL and Verilog Version
Sigasi Studio supports VHDL versions 1993, 2002, 2008, and 2019 as well as Verilog (2005) and SystemVerilog (2012).
You can select the default VHDL version to use in Window > Preferences > Sigasi > VHDL.
You can set the default Verilog/SystemVerilog version in Window > Preferences > Sigasi > Verilog/SystemVerilog.
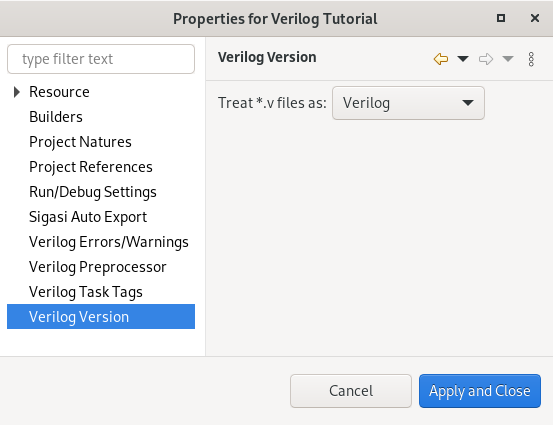
Since Sigasi Studio 3.2, you can also set the language version per project, folder, and file. In the Project Explorer, right-click your project, folder, or file; select Properties > VHDL Version or Properties > Verilog Version and select the version via the dropdown menu.
When you change the language version of a file, only that file is affected. However, when you change the version of a folder, then everything in that folder will have the new language version. Any overrides in the folder and its sub-folders will be removed. When you are defining the language versions for a new project you should map from top (project root) to bottom (files).
The version information is stored in <project path>/.settings/com.sigasi.hdt.vhdl.version.prefs and <project path>/.settings/com.sigasi.hdt.verilog.version.prefs.
We recommend you add this file to version control so you can share it with your team.
Notes:
- VHDL libaries: Any new project that you create will have the Common Libraries (
STDandIEEE) that correspond to your selected VHDL version. Your existing project will not be modified. If you want to update the Common Libraries for an existing project, right-click the project and select Library Mapping > Reset Common Libraries. Since Sigasi Studio 3.3, you will get a warning if your Common Libraries do not match the VHDL version of your VHDL file. You can use the proposed Quick Fix to resolve the issue. - If you want to compile VHDL 87 code, you should select the “1993” option. There are no checks to warn about constructs that were not supported in 1987, but that were introduced in 1993.
- Sigasi Studio does not send the Common Libraries to an external compiler. It is expected that these libraries are pre-compiled.
Colors and Fonts
You can configure the code coloring by selecting Window > Preferences > Sigasi > VHDL > Syntax Coloring. For each class of semantic and syntactic elements, you can select the font, letter color, background color and style (bold, italic, underline, strike through).
Font Size
Sometimes you want extra small fonts such that you can fit more content on your screen. Other times you may want extra large fonts such that you can use a beamer and your audience can see what you are doing.
Most fonts, including the font that is used by the editors, can be controlled in the preferences: Window > Preferences. Fonts are controlled in General > Appearance > Colors and Fonts. The font of the editors is configured in Basic > Text font.
Some fonts cannot be controlled from this preference page. These fonts are defined by general system settings and are used for displayiing the menu names, the Project Explorer View, and the Outline and Hierarchy Views. On
Windows, you can change these fonts by changing your font settings in the Windows Control Panel. On Linux, these fonts are controlled by a settings file: ${HOME}/.gtkrc-2.0. You can change the font by adding a line like:
gtk-font-name = "Sans 10"
You have to restart Sigasi Studio before these changes take effect.
Annotations Colors
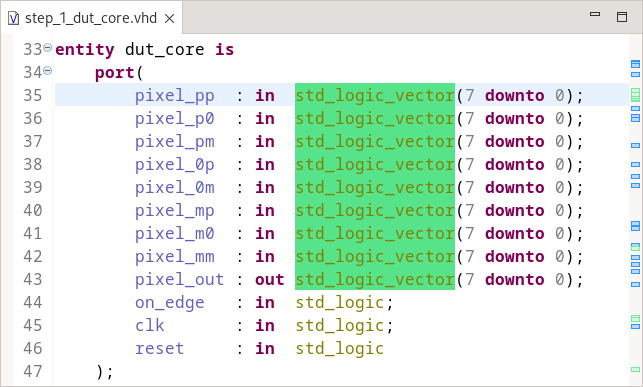
Annotations are colors added on top of your text editor, and to the right of your text editor, in the scroll bar. The image below shows annotations for each occurrence of a certain data type. The color has been changed to bright green.
You can change the color of annotations in Window > Preferences > General > Editors > Text Editors > Annotations.
For the particular case of occurrence annotations, you want to modify the color for annotation type Occurrences.
If more than one Occurrences type is displayed, you need the org.eclipse.xtext.ui.editor.defaultOccurrenceAnnotation.
The others may refer to occurrences for Java or other plug-ins.
Tabs and Spaces
If you want to use spaces instead of tabs, you can set your indentation preferences in Window > Preferences > General > Editors > Text Editors. Here you can select choose to Insert Spaces for Tabs and choose your preferred Displayed Tab Width.
The “Gutter”
The Gutter is the small area to the left of the editor view. It is used for displaying extra information about your code.
- Line numbers: What line is this?
- Quick Diff: Did this file change?
- Folding: hiding pieces of code from view
- Markers: error markers, warnings, and bookmarks.
There is not much to configure about markers, but the other categories can be turned on or off.
Line Numbers
To enable line numbers, right-click in the gutter and select Show Line Numbers.
Quick Diff
Instead of using a compare editor, you can enable quick diff support and see the changes within the text editor. This feature can be enabled via Window > Preferences > General > Editors > Text Editors > Quick Diff.
When you enable Quick Diff, you can see changes in the active editor with the version on disk (or the latest version in version control), by hovering the annotations in the gutter.
Linting Rules
You can choose the severity of linting rules in Window > Preferences > Sigasi > VHDL > Errors/Warnings. Read more information about Linting and Quick Fixes.
Language
Eclipse is available in several languages, and you can install the language pack of your choice. Read more in this support article: Installing translations for Eclipse
Keyboard Shortcuts
Sigasi Studio comes with a large number of Keyboard Shortcuts preconfigured. You can configure keyboard shortcuts (key bindings) in Window > Preferences > General > Keys. You can modify individual keyboard shortcuts or add new key bindings. There is also a preconfigured scheme for Emacs-like keyboard shortcuts.
After you have configured your keyboard shortcuts, you can export your settings and share them with your colleagues (or re-import them on another computer): To export, go to File > Export… > General > Preferences, and select Key Preferences. To import that file: File > Import… > General > Preferences.
Formatting
Formatting options for VHDL are documented in the VHDL Code Formatting section of the Editor manual.