In addition to syntax validation, Sigasi also checks your code for semantic problems. This is often referred to as Linting,or Linter checks. Some of these problems can be automatically resolved with Quick Fixes. Both syntax checking and linting happen at type-time: problems are revealed as you are typing your code.
Linting
A Code Linter is defined as a tool that finds code that is strictly correct according to the language definition, but still suspicious or problematic. Sigasi has a built-in linter, which provides info about code lint in the design.
Configuring the Linting Rules
The Sigasi linter has reasonable defaults for the configuration of reported problems. Nevertheless, the severity level of certain linting rules is configurable for additional flexibility. Furthermore, some linting rules, such as the VHDL maximum line width rule, are parameterized and can be tweaked to your preference.
Sigasi Visual HDL (SVH) offers two ways of configuring linting rules.
- The recommended way is to override these settings for the entire project, folders in the project, or individual files. This configuration is stored in the
.settingsfolder in your project and shared amongst team members. - Alternatively, you can configure the settings for the entire workspace. This configuration is stored for the Sigasi installation and not shared.
For each linting rule, you can set the severity of non-conformities in all code or RTL-specific code. For some linting rules, more configuration options are available in the sidebar of the preference page. Look into the documentation of the specific rule for more details on their effect.
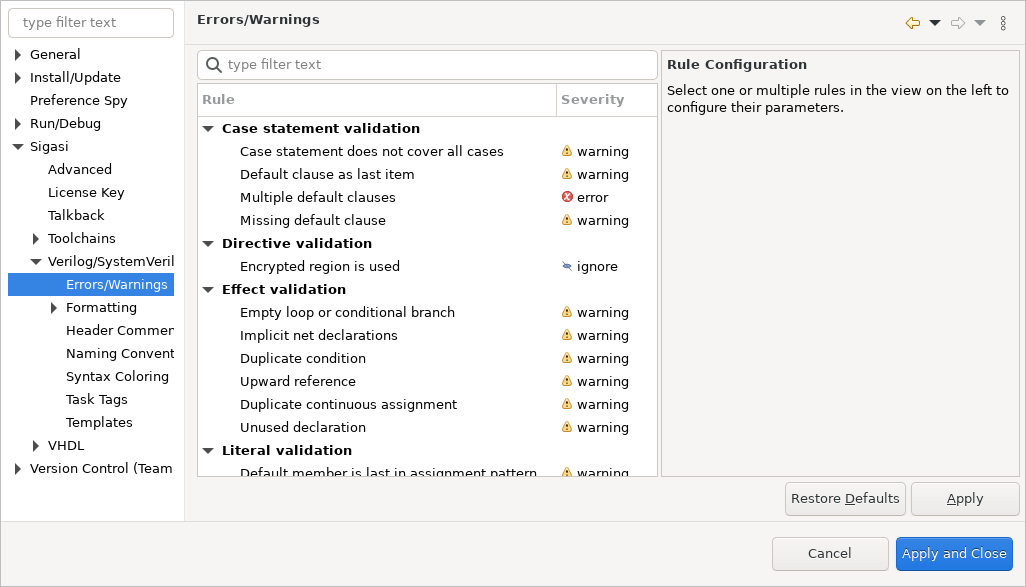
Linting rules can be configured per project, folder, or file by right-clicking a project, folder, or file > Properties and select Verilog Errors/Warnings or VHDL Errors/Warnings. On the top of the dialog, select Enable project specific settings to activate the rule configuration.
You can also configure the rules for the entire workspace through
- Window > Preferences > Sigasi > Verilog/SystemVerilog > Errors/Warnings for Verilog/SystemVerilog rules.
- Window > Preferences > Sigasi > VHDL > Errors/Warnings for VHDL rules.
All configurable linting rules will also offer configure rule Quick Fixes. These can be used to quickly open the preferences corresponding to a specific linting rule.
Suppressing Problems
Specific problems can be suppressed in your code by adding a @suppress comment (-- @suppress for VHDL and // @suppress for SystemVerilog), on the same line as the problem.
You can limit the suppression to a specific problem by adding a prefix of the problem message between quotes after @suppress. Sigasi also recommends adding a reason why the problem was suppressed by adding an extra comment after @suppress:
<line with problem> // @suppress "Problem message prefix" Reason why problem is suppressed
Changes through Sigasi version:
- Since Sigasi Studio 4.2 the
@suppresscomment also suppresses errors. - Since Sigasi Studio 4.3 problems have a Quick Fix to automatically add the
@suppresscomment with a matching problem message prefix. - Since Sigasi Studio 5.4 it is possible to suppress all the problems file-, library-, or project-wide through a single Quick Fix.
No Linting for Common Libraries
Common Libraries are considered to be production-ready libraries. Linting is skipped for all files in the Common Libraries folder.
Language-specific Linting Rules
The currently available linting rules are described in detail on the following pages.
Workspace Settings vs. Project Specific Settings
Workspace linting settings are only valid for the local workspace.
If you enable project specific settings, a .linting.prefs file is created in your .settings folder with the following lines.
eclipse.preferences.version=1
isEnabled=true
The second line (isEnabled = True) makes the workspace settings ineffective. After this point, your project’s linting settings are configured by this file.
Default values are used for the rules that are not configured in the .linting.prefs file.
If you change True to False in the file, then the workspace settings become effective again.
Manual Configuration
Note: manual configuration is discouraged, especially for rule parameters other than severity, because it’s easy to get the syntax wrong.
To configure the severity of the rules, add a line using this template:
${rule id}/severity/${path}={error|warning|info|ignore}
To configure a parameter of a rule, add a line using this template:
${rule id}/params/${parameter}/${path}=${value}
Where
${rule id}can be the number of the rule (e.g. 140), orallto specify preferences for all rule IDs at once.Rule IDs can be found in the Errors/Warnings settings under the Project Properties and Workspace Preferences. They are also included in the list of VHDL Linting Rules and the list of Verilog/SystemVerilog Linting Rules.
Where
${path}can be<project>(literally, with brackets!) to set the severity of the entire project,/path/to/folderto set the severity of an entire folder, or/path/to/file.vhdto set the severity of a specific file.
The valid values for the parameters are documented on the individual linting rule pages. They are described according to these rules:
{value1|value2}means that eithervalue1orvalue2must be used, e.g.truefor{true|false}orbit_vectorfor{enumeration|bit_vector|std_logic_vector}.${integer}means the value must be an integral number, e.g.5. If the number must fall within a range, it is specified in a comment.[keyword...]means the value is any number of keywords (or other strings) separated by tab characters, e.g.ENTITY PACKAGE
If any of the strings must contain a tab character or a single quote, escape it using a single quote. For example, below is a list of 2 items, the first
a<Tab>taband the seconda'quote.a' tab a''quote
${regex}means the value must be an RE2/J regular expression, e.g.0|1.
Whitespace in keys must be escaped with a backslash (\``). You can add comments using a #`.
Examples
72/severity/<project>=IGNORE
72/severity//Folder\ name/Extra\ folder=INFO
72/severity//test/top.vhd=WARNING
237/params/fsm_state_type//test/top.vhd=ARRAY_OF_LOGIC
236/params/allowed_literal_pattern/<project>=0|1
Marker Icons
 marks an ignored problem that has a Quick Fix.
 marks an ignored problem.
 marks an info message that can be resolved automatically with a Quick Fix.
 marks an info message.
 marks a warning that can be resolved automatically with a Quick Fix.
 marks a warning that cannot be resolved automatically.
 marks an error that can be resolved automatically with a Quick Fix.
 marks an error that cannot be resolved automatically.
Export Markers
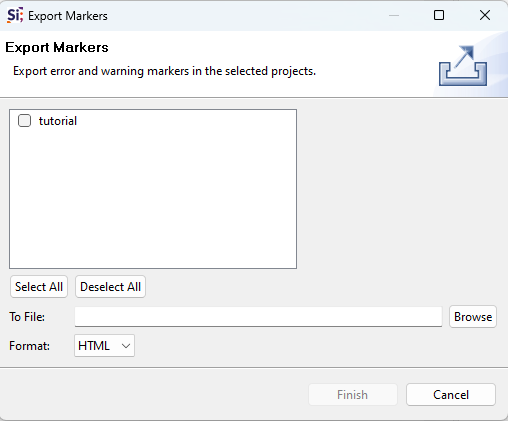
You can export markers for the entire project via the Export… menu. This feature is quite useful if you want to focus on the markers without generating documentation.
First, you have to check the box that is located next to the name of your project. You can then select the format of the file (either HTML or CSV) to be generated.
Markers Report
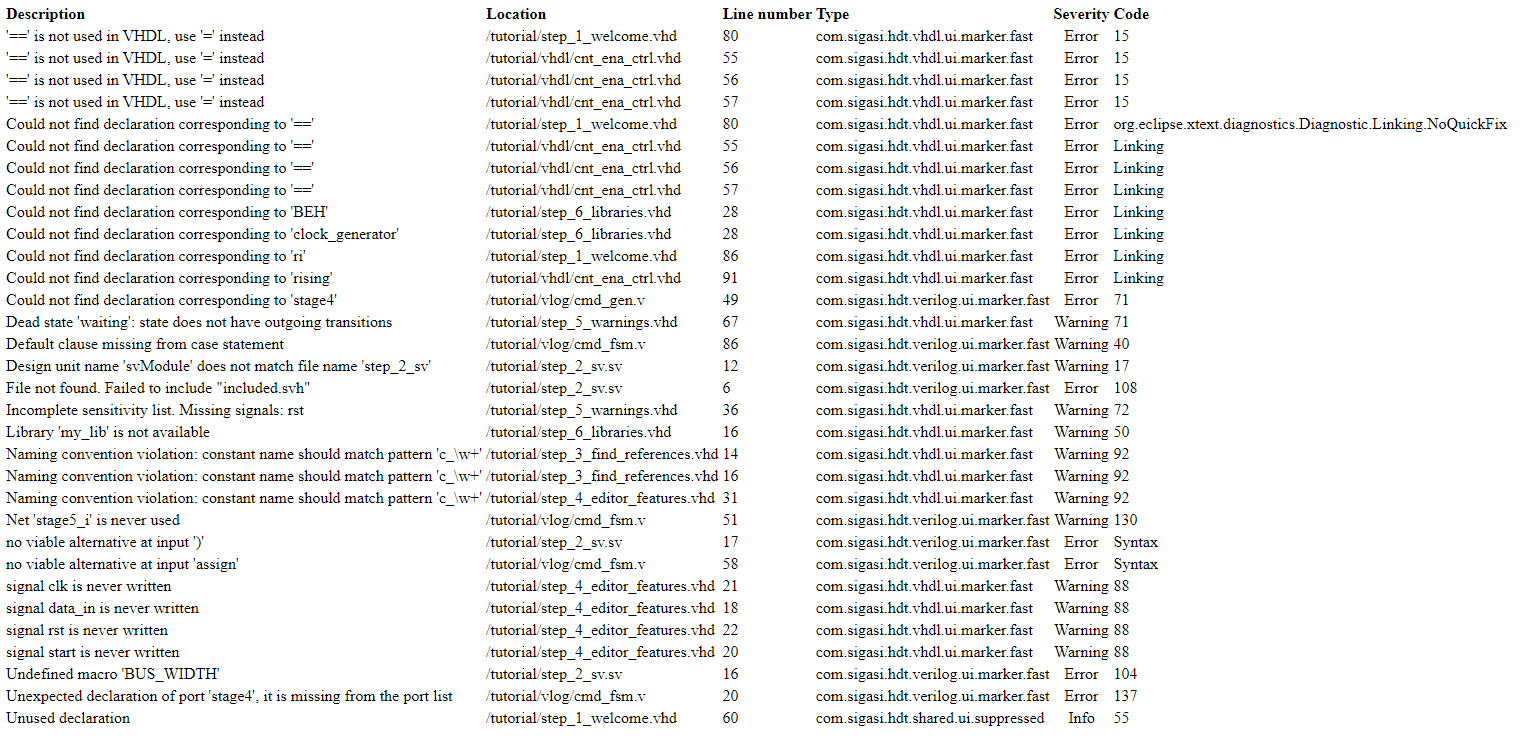
In the report, you can see all the markers in your project. The entries in the report are layed out in six columns:
- Description: shows what the marker is about
- Location: shows in which file the problem is marked
- Line number: line number of the marker
- Type of the marker
- Severity: severity that is set in the linting preferences
- Code: linting rule number for problem type
Note that suppressed markers are also listed in the report (see the last line in the image below).
Naming Conventions and Header Comment Checks
Sigasi can check whether all sorts of names in the design -
entities, instances, modules, signals, variables… - follow
particular patterns. This may help designers to follow their
company’s or team’s coding rules. For example, coding rules may
prescribe that signal names must have a s_ prefix, that generics
names must be written in capitals, or that variable names must use
CamelCase. A naming convention rule is empty by default, which means
that the particular rule is not checked.
In addition, Sigasi can also check for header comments of files, design units, subprograms, etc. This could for instance be used to check whether a copyright notice or disclaimer has been included in the file header comment.
Workspace-wide naming convention settings are accessed via
- Window > Preferences > Sigasi > Verilog/SystemVerilog > Naming Conventions for Verilog and SystemVerilog, and
- Window > Preferences > Sigasi > VHDL > Naming Conventions for VHDL.
Workspace-wide header comment check settings are accessed via
- Window > Preferences > Sigasi > Verilog/SystemVerilog > Header Comments for Verilog and SystemVerilog, and
- Window > Preferences > Sigasi > VHDL > Header Comments for VHDL.
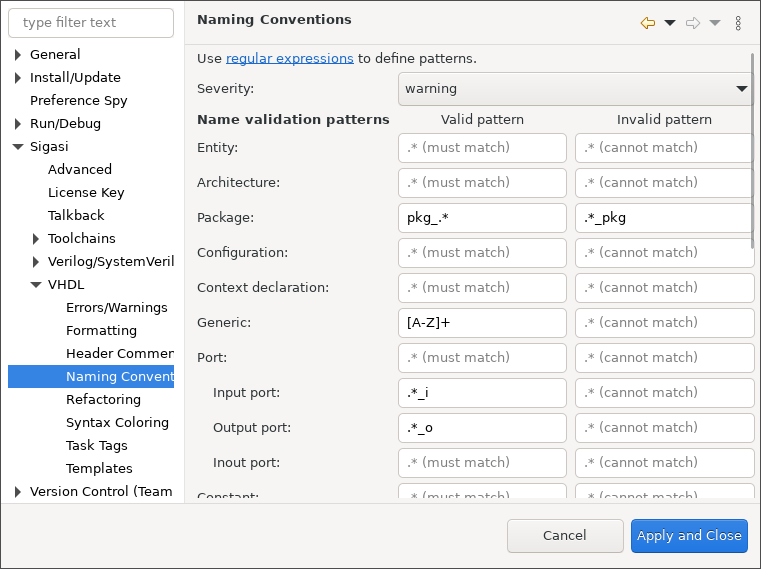
At the top, you can set the severity of naming convention non-conformities. Below, you can enter the validation patterns. Patterns use the RE2/J regular expressions syntax. Note that names are not validated if the corresponding validation pattern is empty.
Note that you can add two patterns per name: a valid pattern that the name must match (a marker will appear if it does not match) and an invalid pattern that the name must not match (a marker will appear if it does). You can set either or both patterns per name.
You can also configure naming conventions and header comments per project, or even per file or folder. You can read more on this on the Naming Conventions and Check Header Comment pages.
Quick Fixes
Problems that have markers annotated with a lightbulb icon (like ![]() )
can be automatically resolved through a Quick Fix.
To trigger a Quick Fix, click the problem marker or press Ctrl+1 and select the Quick Fix.
Quick Fixes can also be triggered from the Problems View by right-clicking
on a problem and clicking
)
can be automatically resolved through a Quick Fix.
To trigger a Quick Fix, click the problem marker or press Ctrl+1 and select the Quick Fix.
Quick Fixes can also be triggered from the Problems View by right-clicking
on a problem and clicking Quick Fix. Multiple problems of the same kind can also be selected in the Problems View, to
fix them all at once.