Introduction
HDL libraries are a very powerful feature of the HDL languages. Sigasi Visual HDL (SVH) makes it easy to configure and use them. In this chapter, we assume that the basic concepts of HDL libraries are understood. We will explain how they are implemented in SVH.
Like with any HDL tool, SVH needs to know where the libraries are located on the file system. We will describe how the library configuration can be examined and modified using the GUI.
We will also present some use case about how to set up libraries with SVH to organize your projects.
Examining the library configuration
You can examine the library configuration in the Libraries View and in the Project Explorer view. The Libraries view shows how design units are mapped. The Project Explorer view show how VHDL or SystemVerilog files are mapped.
In the Libraries view you can see a tree of all libraries in your projects. You can open each library to see all contained design units as well as their description style.

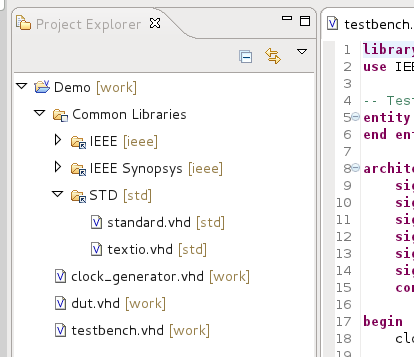
In the Project Explorer view each physical file or folder is annotated with the library it belongs to, between square brackets:
What you see here is the initial library mapping of a demo project (you
can create such a project by selecting File > New > Other > Tutorial
VHDL Project or Tutorial SystemVerilog Project).
In the screenshot we see a project called Demo, with a folder named
Common Libraries. In that folder, you see the typical standard
libraries (std and ieee) upon which all VHDL projects depend. The
demo project itself consists of a few VHDL files.
Next to the project’s name Demo, is the annotation work. This means
that, barring any overrides, everything in the project will be stored
inside the work library.
Lower down, we see overrides. For example, the STD folder has an
annotation std. This means that, again barring any further overrides,
the entire contents of the STD folder will be mapped into the library
std. There are no limits to the number of overrides that can be
performed. If this needed, any individual file can be mapped to a
separate library.
Modifying the library configuration
The library mapping for project files can be modified in the Libraries and Project Explorer view.
Select a file or a folder in the Project Explorer and right-click.
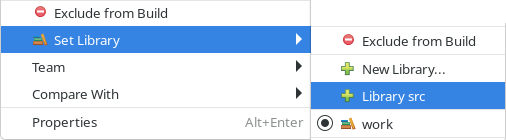
You get a Set Library context menu, with a number of options:
- Select Exclude from build to exclude the file or folder from any library
- Select New Library… to define a new library and map the file or folder to it
- If one ore more folders are selected, the folder can be added to a library with the folder name(s)
- Select the name of an existing library to map the file or folder to that library
When you map a file into a library, only that file is affected. However, when you map a folder into a library, then everything in that folder will be mapped into that library. Any overrides in the folder and its sub-folders will be removed. When you are defining the library mapping for a new project you should map from top to bottom.
So in the case of our Demo project, you would change (if work is not
a good default) the top folder’s mapping first and then override the
mapping in the sub-folders.
When you are changing the library mapping of a project, the project will be rebuilt completely. In order to avoid several consecutive rebuilds while you are setting up your libraries, you can temporarily disable the automatic rebuilds, until you are finished setting up your library mappings. You can do this by disabling the Project > Build Automatically option.
To exclude a file from all libraries, the library mapping context menu
provides an Exclude from build option. You can apply that to any file or folder in
the project. SVH will then assume that the corresponding resource is
not a part of the project and will not include that resource in a
project build. This is typically useful when you have stale copies of
HDL files or folders lying around that you want simply to be ignored.
(System)Verilog include files
(System)Verilog include files are always excluded from the build. Any
file that is included in another design file gets excluded from the
build, even if it has an extension that would normally identify it as
a design file, e.g. .v or .sv. It often doesn’t make sense to
compile include files by themselves. Instead, include files are
compiled in the context of the file in which they are included.
Configuration file
All library configuration information is stored in the .library_mapping.xml
file in the root of your project.
If you edit this file, your project will be cleared and rebuilt automatically
(a so-called Clean Build).
SVH only writes changes to this configuration file when you make changes to the library configuration with the context menu in the Project Explorer. When you do make changes, SVH first checks that all paths in the library configuration still exist. If a path no longer exists, it will be removed from the configuration file. Note that the library configuration file is case-sensitive, even on Windows.
Library configuration warnings and Quick Fix
If the library mapping file contains invalid entries, there will be a warning on the .library_mapping.xml file.
This warning will show in the Project Explorer, in the editor and in the Problems View.
An associated Quick Fix is available through the Problems View.
When invoked, it will remove all invalid entries from the .library_mapping.xml file.
Common Libraries
Each project has a folder called Common Libraries.
This is where reusable libraries go: either vendor libraries, third party IP
libraries or your own reusable libraries. By default, the STD and IEEE
libraries are added to this folder.
The Common Libraries folder behaves like any other folder.
You can delete it, rename it and apply a different library mapping.
In most cases, however, the default configuration is just what you need.
If your project doesn’t have a Common Libraries folder, you can just
create it by right-clicking the project in the Project Explorer and
selecting the New > Folder dialog. In the New Folder dialog,
select Advanced and Virtual Folder and name the folder Common Libraries.
How to add files to Common Libraries?
In any newly created Sigasi project, the Common Libraries folder
contains the VHDL files of the IEEE and STD libraries.
To add files to the Common Libraries folder, locate a folder with HDL files on your file system using the Project Explorer or the file explorer of your OS and drag the folder with HDL files to the Common Libraries folder.
Alternatively, you can right-click the Common Libraries folder and select the
New > Folder dialog where you can use the Advanced » settings to create
a Linked Folder pointing to the actual folder location that contains the
files you wish to add to the Common Libraries.
How is Common Libraries different from another folder?
Common Librariesby default is a virtual folder. This means that it is not a real folder in the project directory and it can only contain references to folders on your file system.- Files in
Common Librariesare supposed to be error free. SVH will not mark errors or warnings in these files.- Next to these, a few other libraries’ errors and warnings are never marked, regardless of their location.
These libraries are:
std,ieee,altera_mf,altera,XilinxCoreLib,unisim,mentor,lpm,simprim,std_developerskit,unimacro, andmodelsim_lib.
- Next to these, a few other libraries’ errors and warnings are never marked, regardless of their location.
These libraries are:
- While you work on your project, you don’t want to edit the files in the
Common Libraries, but you need them to compile your project. - If you activate an external compiler,
files in
Common Librariesare supposed to be pre-compiled. If you tell SVH to compile your project using an external compiler, the Common Libraries are skipped. You need to pre-compile them yourself and let your compiler know where the compiled libraries are. For ModelSim, you can use the “modelsim.ini” file for this. If your project root contains a “modelsim.ini” file, it will be used instead of the default “modelsim.ini” file.
Pre-compile Common Libraries
This section links to various recommendations on to pre-compiling the simulation models of external libraries in the Common Libraries, depending on the external compiler.
AMD/Xilinx
Recommendations for AMD/Xilinx ISE
Recommendations for AMD/Xilinx Vivado
Intel (formerly Altera)
Example script to compile Intel simulation libraries
GHDL
The GHDL manual documents precompilation of Vendor Primitives here .
Riviera-PRO
If you’re using Riviera-PRO, Aldec has an article on Compiling Xilinx Vivado Simulation Libraries for Riviera-PRO .
VUnit
Running VUnit tests
You don’t need to pre-compile VUnit libraries for running
VUnit tests. The VUnit framework compiles its own library when needed.
If you’re using libraries like OSVVM, you need to call
add_osvvm() in run.py to tell VUnit to also compile the OSVVM
library.
Further documentation on using VUnit in SVH is available here.
External compiler in a VUnit project
If you want to configure an external compiler in a VUnit project (e.g. for additional syntax checking), you need to ensure that the compiler has the VUnit library. Otherwise, the compiler will flag all VUnit constructs in your HDL code as errors.
This script demonstrates how to compile and enable the VUnit library for Modelsim and Questa. Run this script in the folder where you want to install the compiled VUnit library. This should be outside your project folder. The script takes the path of your VUnit installation as a parameter. Once the compilation is finished, go to your project folder and run these commands:
vmap -c  # only if your project folder doesn't contain modelsim.ini already
vmap <folder_where_the_script_ran>/vunit_lib vunit_lib
Note that the OSVVM library is shipped with Modelsim, so you won’t need to compile it yourself.
For other external compilers, a similar approach is needed. Customers who need help with that are welcome to contact support.
What if I broke my Common Libraries folder?
If you have modified the Common Libraries folder, you can always
revert it back to the original state.
Right-click on the Common Libraries folder of your project in the explorer
view and apply menu-entry Set Library > Reset Common Libraries.

Resetting the library mapping
SVH contains two functions to reset all or part of the library mapping.
Reset Common Libraries updates the common VHDL libraries to the version (‘93, ‘2002, ‘2008, ‘2019) required by your project. User-defined common libraries remain untouched. To access this function, right-click the
Common Librariesfolder inside your project in the Project Explorer and select Set Library > Reset Common Libraries.Reset Library Mapping resets the entire library mapping of your project. After resetting the library mapping, Common Libraries are reset as above, and all design files are mapped to library
work. Note that this action cannot be undone, so only use it when you want to rebuild the library mapping from scratch. To access this function, right-click your project in the Project Explorer and select Set Library > Reset Library Mapping.
IEEE Vital
See How can I use the IEEE Vital libraries with Sigasi Pro?
Shared libraries
SVH allows you to share libraries between multiple projects. The easiest way to do this, is to develop each library in a separate project and configure the Project Dependencies accordingly. To configure the project dependencies, right click the project (the one that uses the shared library) and select Properties. Next click Project References and mark the library project as referenced project.
Adding third-party libraries to a project
If your project uses libraries from Quartus or Vivado or standalone libraries (e.g. UVM), SVH provides a mechanism that makes it easier to add such libraries to a project and to switch between versions of libraries and toolchains.
First, SVH needs to know the location of your toolchains and standalone libraries on your system. SVH can automatically detect Quartus and Vivado installations:
- in default installation locations:
/opt,/tools,C:\,<home>, and<home>/Documents. - via environment variables that point to installation or
bindirectories of these tools (e.g.QUARTUS_ROOTDIR,XILINX_VIVADO,PATH, etc.).
You can go to Window > Preferences > Sigasi > Toolchains and Libraries to see what toolchains were detected (they would be greyed out and have a (detected) mark).
You can override detected toolchains or add additional toolchain installations and external libraries there as well:
- When adding a toolchain, you’ll have to specify:
- the installation path,
- the Kind (
QuartusorVivado), and - an alias that would be used in a project to reference this installation.
- When adding a library, you’ll have to specify:
- the library path,
- the library name, that would be used to map HDL files,
- the layout, which would configure how to link this library (at the moment, only two layouts are supported: a
UVMlibrary layout or aDefaultone that would simply link, map, and add a specified directory to include paths), and - an alias that would be used in a project to reference this library path
Note: Once you specify the installation path for known toolchains and libraries, all other fields will be pre-filled with default values that you can change if needed.

You can expand toolchain nodes in a tree to see which libraries SVH extracted for that toolchain and are ready to be used in your project.
You can Reload Libraries of a selected toolchain or Reload all Toolchain Libraries. You can choose whether to extract only family-independent libraries or all libraries.

When you expand a library node, you can see what files or directories would be linked to a project,
mapped to a corresponding library or added as an additional include path if you decide to use this library in your project.
Once you’ve added all required toolchains and libraries, press the Apply button to save changes.
Now you can go to your project properties (Properties > Linked Libraries) and select what libraries you want to use in your project
(if you don’t need them later on, you can unselect them here as well).
After pressing the Apply button, the selected libraries will be linked to your project in the Common Libraries folder
(while unselected libraries will be removed). In a “Source” column you can see what library or toolchain version is used.

Note: If the project configuration for a linked library is out-of-sync with an intended library layout (e.g. library files mapping was manually changed), this library will be marked as (out-of-sync) on this page. Pressing the Synchronize button will fix the configuration of all linked libraries that are out-of-sync.
If you have multiple toolchain installations or library versions and would like to use a different one,
you can pick the desired version in your project properties: go to Properties > Active Toolchains and Libraries, select the desired version, and click Set as Active.
Don’t forget to press Apply after you’ve made changes.

Note: When you link libraries this way, your project file and project settings will contain only aliases of toolchains and libraries, not their absolute paths on your system. This way, when multiple people work on a project, it’s sufficient to add a toolchain or library with the same alias in workspace settings (or use the same environment variable to point to the library or toolchain installation path).
Library errors from external compilers
If you are using the External Compilers, the external compiler
can also put error markers on library clauses. You can easily verify this by
checking the prefix of the error message (e.g. vcom: for vcom errors).
Consult the Libraries section of the external compiler
integration for more information on configuring libraries for your external
compiler.