Advanced setup in Sigasi Visual HDL (SVH) is meant for engineers and organizations who want to:
- automate the setup of SVH
- automate the setup of a project (or a set of related projects)
- combine Sigasi’s VHDL and SystemVerilog support with other programming languages, version control settings, or different Eclipse plugins
- ensure that all team members share the same settings (indent style, templates, linting preferences, etc.).
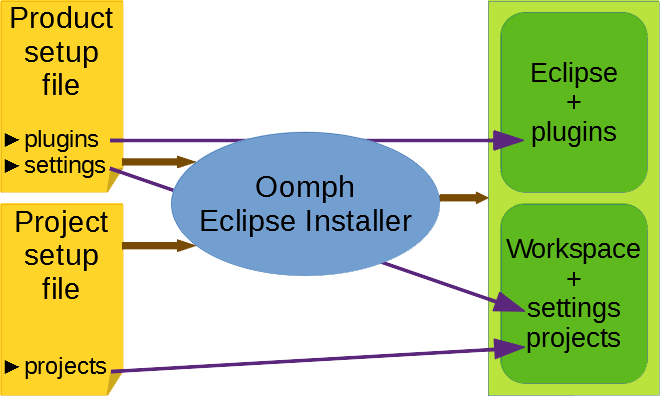
The advanced setup uses Oomph , a highly customizable installer for Eclipse, configured with setup files. Most team members will use these files when setting up a new version of Eclipse and/or when they join a new project. Only every now and then, e.g. at the start of a new project, will a setup file need to be created or updated.
For the standard setup procedure for SVH, look here.
The user perspective: using existing setup files.
Setting up the latest version of Eclipse with the SVH plugin is easy and straightforward. One or two files are needed:
- The product setup file determines the Eclipse setup, e.g. plugins and workspace settings.
- The optional project setup file tells Eclipse how to set up a project, e.g. from a version control system.
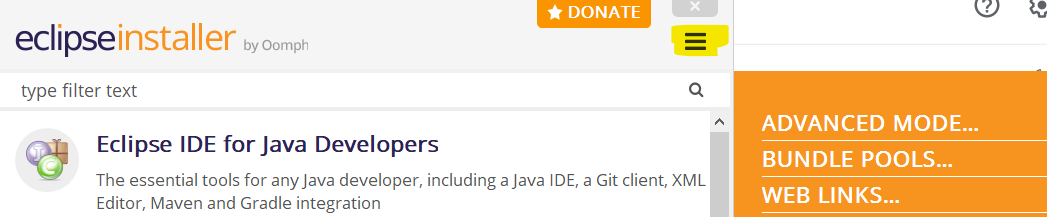
To get the installation started, download, unzip, and run the Eclipse installer . In the top-right corner, click the 3 horizontal bars (the burger menu) and select Advanced Mode….
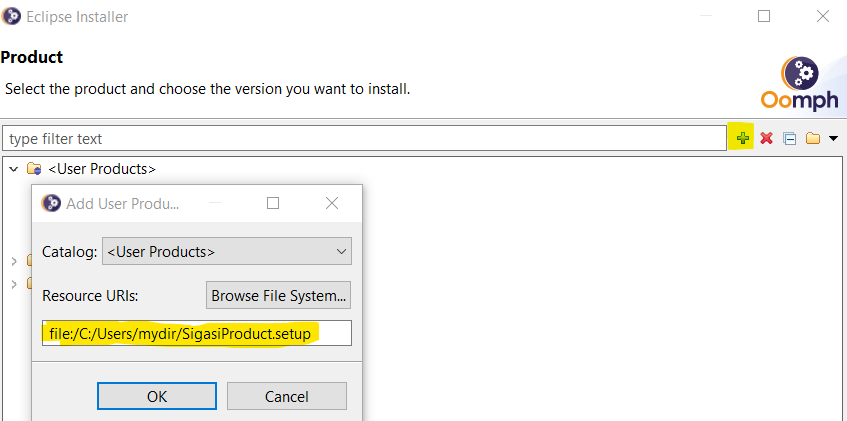
Next, click on the plus icon next to the filter text and enter the URI of the product setup file. This can be a file on your system or a web link, e.g. to a file on your team’s internal web page. For demo purposes, you can use our example file. Click OK to close the pop-up.
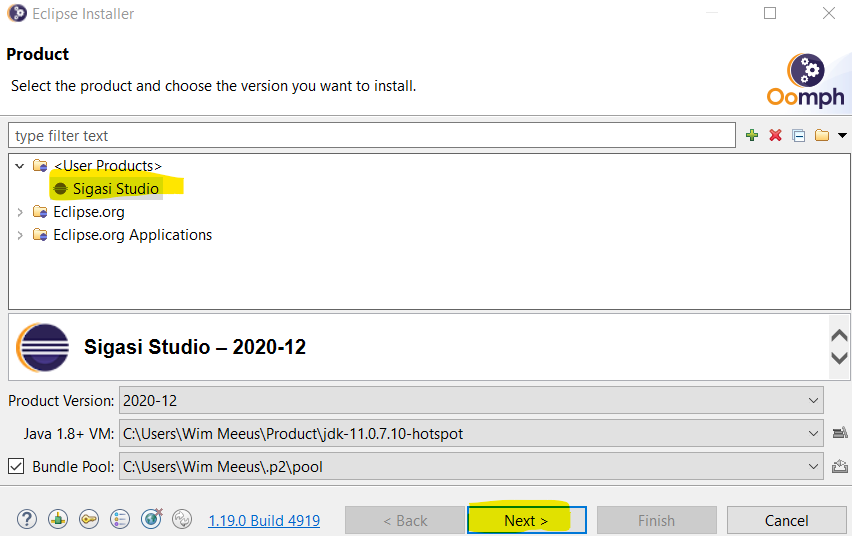
Select the desired product setup under User Products and click Next >.
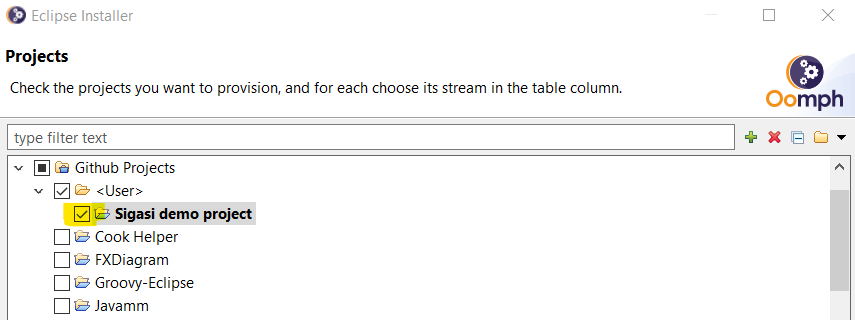
Now you can optionally select a project to set up. Again, click the plus icon next to the filter text and enter the URI of the project setup file. You may want to try our demo project from https://insights.sigasi.com/resources/manual/SigasiDemoProject.setup, which will set up a Sigasi project using git version control. Select the desired project (checkbox) and click Next >.
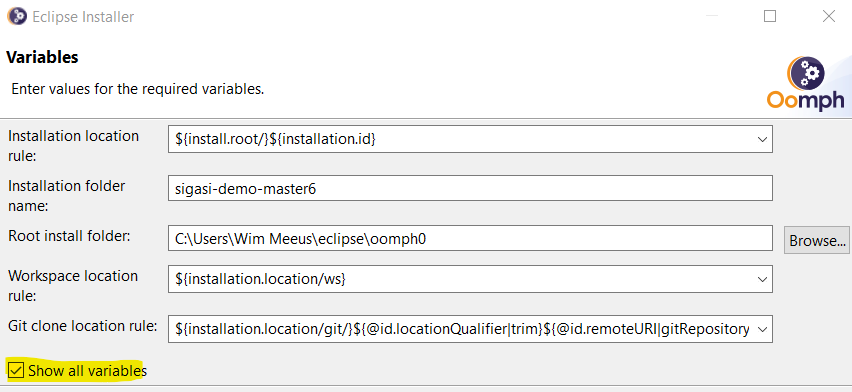
Next, configure the path for your Eclipse installation, workspace, and project. Check Show all variables to see all relevant paths. Make changes if required and click Next > to continue. On the next screen, click Finish to start the setup process.
At the end of the product setup (Eclipse install), Eclipse starts up. If you selected a project setup, a second Eclipse installer starts for that purpose. When finished, you can close the Eclipse installer window(s) by clicking Finish.
Your new Eclipse with SVH is now ready, with the optional project if one was selected.
Setting up the setup files
So far, we’ve seen how a user can set up Eclipse, SVH, and projects quickly and easily using setup files. These setup files are convenient for teams to keep tool settings consistent among members.
This section discusses how to create and modify setup files. Setup files use XML format, which means that they are structured text files and therefore human readable. The Eclipse Oomph plugin has a convenient graphical editor for these files. Using a text editor is error-prone and therefore not recommended.
Setting up Eclipse Oomph
Oomph is an Eclipse plugin, so you’ll want to either run Oomph in your current Eclipse, or install a separate (minimal) Eclipse. The Eclipse installer can be found here . Recent versions of Eclipse contain Oomph by default, so you shouldn’t need to install anything extra.
If your Eclipse doesn’t contain Oomph, open Eclipse, go to Help > Install New Software…, enter http://download.eclipse.org/oomph/updates/release in the box next to Work with, select the Oomph Setup > Oomph Setup, and proceed with the installation.

Then, create a new General project to contain the setup files: File > New > Project… > General > Project, name the project, and click Finish.
Now you can either create new product and project setup files in this project or copy (drag & drop or otherwise) files into the project for customization.
Product setup file
For a product setup file, we recommend starting from one of our examples: either a fairly minimal SVH.setup or an example in which a few extra workspace options are configured: SVHPlus.setup. Place one of these files in your Oomph project and open it for further customization.
If you prefer to start from scratch, right-click your Oomph project and select New > Other… > Oomph > Setup Product Model, and check out one of the above examples for the basic configuration.
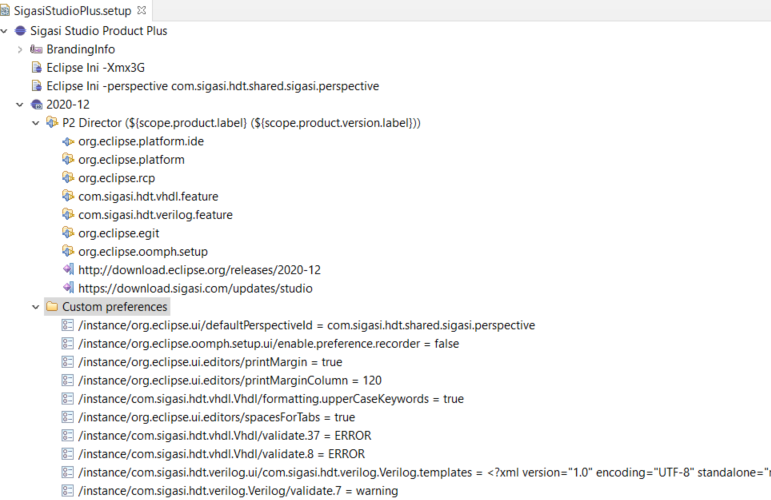
Both examples will install Eclipse with SVH and Git revision control. The minimal example will additionally configure the maximum heap space for Eclipse, it will enable the Sigasi perspective, and it will turn off the Preferences Recorder. The extended example, shown above in the Oomph editor, contains further options for linting severities, formatting options, and an autocomplete template.
Note the three groups of settings:
Eclipse Ini: settings that will go in
eclipse.ini.P2 Director: plugins to install and the repositories where they can be found. Here you can add additional plugins, e.g. to support an additional programming language or a different revision control system. To add an item, right-click P2 Director, and select New Child > Requirement for an additional plugin, and subsequently New Child > Repository for the plugin repository.
Custom preferences: workspace settings. Here you can fine-tune workspace settings to the need of your team. To add a new preference, first find the key and the value of the preference which you want to configure (see below). Then, right-click Custom preferences and select New Child > Preference. Then fill out the key, the value and the optional description.
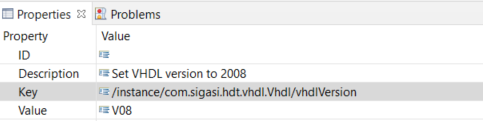
Finding keys and values of workspace preferences is easy: First, install a custom Eclipse with the setup file as it is, i.e. without preferences. In that copy of Eclipse, select Window > Preferences > Oomph > Setup Tasks > Preference Recorder, check the Record into: checkbox, and click the Open the recorder target file icon on the same line. Then, set other preferences as desired. After clicking Apply and Close, a pop-up like the one below shows the information for the key and value to configure.
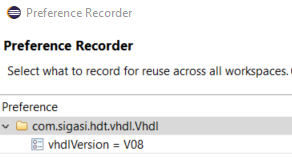
In this example, the key and value are:
- key:
/instance/com.sigasi.hdt.vhdl.Vhdl/vhdlVersion - value:
V08
After adding the desired preferences and plugins, it’s time to save the setup file and use it with the Eclipse installer, as described here.
Project setup file
For a project setup file, we recommend starting from our example: SigasiDemoProject.setup, which you can copy into your Oomph project and open for further customization. If you prefer to start from scratch, right-click your Oomph project and select New > Other… > Oomph > Setup Project Model, and check out the above example for basic configuration.
Specify the location of your project and save the file. Now it is ready for use in the Eclipse installer.
We recommend saving project preferences in version control with
the project, rather than in a project setup file. That way, changes to
project settings get propagated to all team members effortlessly and
each revision of the project contains matching project settings. To
that end, store .project, .library_mapping.xml, and .settings for
your project in version control.