Sigasi CLI is Sigasi’s new command line tool for HDL verification. With Sigasi CLI, you can run the same powerful verification as Sigasi Visual HDL (SVH) from the command line. Verification encompasses different aspects, such as syntax checking (is the code syntactically correct?), linting (is there anything suspect in the code?) including semantic checks (do constructs make sense and are they consistent?) and style checking (does the code comply with coding guidelines?).
In a number of previous articles, we have demonstrated how to use Sigasi CLI in Continuous Integration (CI) in Jenkins and GitLab CI. In this configuration, Sigasi CLI verifies your project’s HDL code when it’s pushed to the Git repository. But wouldn’t it be better to prevent flawed code from reaching the repository at all?
In this article, we’ll show how to use Sigasi CLI as a commit
hook for Git repostories. With the setup which we will present
here, CLI runs whenever anyone issues a git commit, and an
unsatisfactory CLI outcome prevents the commit from happening.
The designer is required to fix the problems in the code before they
submit their work. By doing so, we can keep flawed code out of the
repository.
Setting up a commit hook
Linux setup
Setting up a commit hook is easy and straightforward. In the root
folder of your Git project, you’ll probably find a subfolder
.git/hooks with a number of sample hooks in it. If the folder is
not there, you can simply create it, e.g. mkdir -p .git/hooks . If
you’re not using a pre-commit hook yet, create a file pre-commit in
the .git/hooks subfolder with this content:
#!/bin/bash
sigasi-cli verify --fail-on-error .
The above script assumes that Sigasi CLI is installed in your PATH. If
that is not the case, either add CLI to your PATH environment
variable or add the full path in the script.
You also need a valid Sigasi CLI license. You can install the license
file as ~/sigasi.lic or have either $SIGASI_LM_LICENSE_FILE or
$LM_LICENSE_FILE point to the license. These variables can be set
either in your shell or in the pre-commit script. Further
information on license configuration can be found in the Sigasi manual.
The path and license setup could look like this (bash syntax)
export SIGASI_LM_LICENSE_FILE=/path/to/sigasi.lic
export PATH=$PATH:/path/to/sigasi-cli/folder
You can (preferably) add these lines to your .profile, .bashrc
etc. so they apply to both your interactive shell and the commit
hook. Alternatively, you can place them inside pre-commit after the
first line, in which case they only apply to the pre-commit hook.
Finally, don’t forget to make the file executable (chmod +x .git/hooks/pre-commit). For testing, cd to the root folder of the
git project and run the script from the command line.
.git/hooks/pre-commit
If all goes well, Sigasi CLI runs and shows its findings on the console.
If you don’t get any output, that means that CLI didn’t find
any suspicious code in your project. If anything is wrong with
your PATH or license setup, this test will tell you as well.
Now make a (small) change to the HDL code and commit the change, e.g.
git commit -a
The pre-commit hook runs before you’re prompted to enter a commit message. CLI shows its findings in the console. If any errors were reported, the commit is aborted. If no errors are found, the commit continues and you’re prompted to enter a commit message. Goal achieved: one can only commit code without errors.
Windows setup
Setting up a git hook on Windows is very similar to the Linux
setup. Git on Windows comes with an installation of a number of Linux
tools, including the bash shell. Git uses bash to run hooks, and not
Windows’s cmd shell or Powershell. So in fact, you’ll be using a
Linux-style script in Windows. One important difference though is that
in Windows, you need to run CLI using a Windows batch script. To
install the pre-commit hook, put a file .git/hooks/pre-commit in
your git project with the following content:
#!/bin/bash
sigasi-cli.bat verify --fail-on-error .
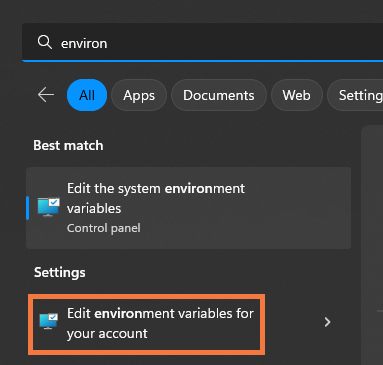
You’ll also need to configure the license and add Sigasi CLI to the
PATH setting. Open the environment variables for your account.
Configure the CLI license using either the
SIGASI_LM_LICENSE_FILE or LM_LICENSE_FILE variable. The value of
the license variable depends on your setup. Additional information on
license configuration is in the Sigasi manual. Also add the CLI folder to the Path variable.

Once this is done, you can test the hook from a bash shell in Windows (not cmd or PowerShell!) by simply running the script from the git root folder:
.git/hooks/pre-commit
Or you can commit a change to the project. git commit will run
Sigasi CLI. You’ll see CLI’s findings on the console, and if no
errors are found, you’ll be prompted for a commit message.
Adding a clear message
Now that our initial goal, keeping code in revision control compliant
with Sigasi’s checks, has been achieved, we’ll look into a
small refinement. As it is now, git commit simply terminates with a
list of errors and warnings if errors are present. It would be nicer
to explicitly tell the user why the commit has failed, and what
they’re supposed to do to fix that.
Extending the pre-commit hook .git/hooks/pre-commit as follows will
produce the desired message. Note that the script stores Sigasi CLI’s
exit code in a variable, and calls exit with this exit code at the
end. This is necessary to report CLI’s exit code, which indicates
success or failure, to git commit.
#!/bin/bash
sigasi-cli verify --fail-on-error .
SIGASI_CLI_RESULT=$?
if [[ $SIGASI_CLI_RESULT -ne 0 ]] ; then
echo
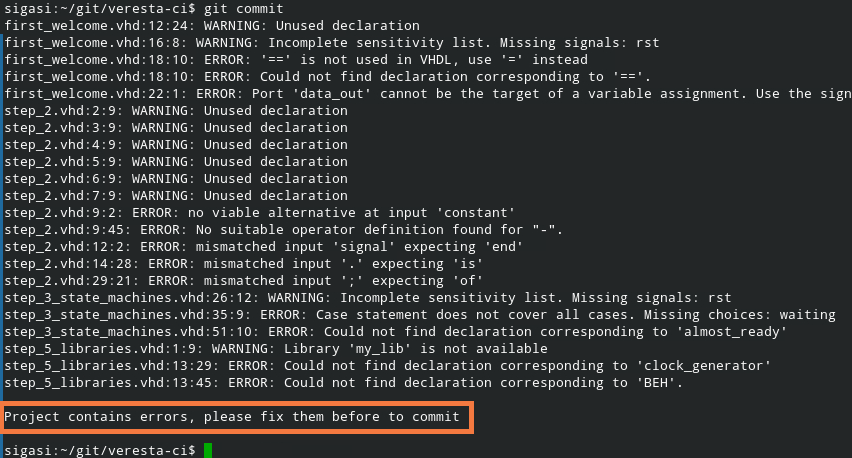
echo Project contains errors, please fix them before committing
echo
fi
exit $SIGASI_CLI_RESULT
In a project with errors, the output now clearly tells the user what needs to happen.
Using the pre-commit hook in a team
An important thing to know is that hooks are not automatically installed or activated when a git repository is cloned or updated. Automatically installing hooks would be a security threat, as someone may - accidentally or not - introduce harmful code in a hook, which would be executed by everyone who uses the repository. Installation of hooks is always up to the user. Design teams may set up scripts to copy hooks into a newly cloned copy of a repository.
A small caveat
A further consideration is that users can get around hooks. If a user
either hasn’t installed the pre-commit hook, or they tell git to skip
the pre-commit hook using git commit --no-verify, verification
doesn’t run and buggy code can still be committed and pushed to a
repository. So, while CLI in a pre-commit hook is a helpful tool,
it’s not a silver bullet to keep your design repository clean.
Running CLI in a Continuous Integration (CI) pipeline remains
instrumental for that purpose.
Conclusion
In this article, we have demonstrated how to use Sigasi CLI as a pre-commit hook in a Git repository. It helps to keep a high code quality by preventing faulty code from being committed to the repository. In addition, it is recommended to also run CLI as part of a CI pipeline.
See also
- Monitoring HDL code quality with Sigasi CLI and SonarQube (knowledge)
- Using Sigasi CLI for HDL Code Verification in GitLab CI (knowledge)
- Using Sigasi CLI in Jenkins CI (knowledge)
- Documentation generation in CI with Sigasi CLI (knowledge)
- Using VUnit in a GitLab CI Verification Environment (blog post)