Sigasi CLI is Sigasi’s new command line tool for HDL validation. With Sigasi CLI, you can run the same powerful code validation as in Sigasi Visual HDL (SVH) from the command line. Code validation encompasses different aspects, such as syntax checking (is the code syntactically correct?), code linting (is there anything suspect in the code?) and style checking (does the code comply with coding guidelines?).
In a previous article, we demonstrated how to use Sigasi CLI in a Continuous Integration (CI) pipeline in Jenkins.
In this article, we’ll show that it is equally possible to run Sigasi CLI in a GitLab CI pipeline. In addition to running CLI, we’ll show how to build a Docker container with Sigasi CLI, and how to report CLI’s results in GitLab CI.
For the purposes of this article, we’ve set up a Gitlab project , taken from the Sigasi Studio 4.x VHDL built-in tutorial. As the bare tutorial project is incomplete, it contains a number of problems which Sigasi CLI will flag. Feel free to make your own copy of the project and explore further. Sigasi customers, as always, are welcome to contact support with further questions.
The remainder of this article is organized as follows: First, we briefly discuss the setup of a GitLab runner (which runs GitLab CI jobs) and the creation of a Docker container image for Sigasi CLI. Then we show how to set up a GitLab CI pipeline to run CLI. Finally, we demonstrate how to present CLI’s findings using GitLab’s Code Quality plugin.
GitLab CI setup
GitLab runner setup
GitLab runs CI jobs on so-called Gitlab Runners . Depending on your Gitlab setup, runners may already be available, or you may need to set up some. In our example, we make use of a Docker runner, but you can use a different kind of runner as well. When setting up a runner, make sure that it has access to your Sigasi license server. Without access to the license server, Sigasi CLI won’t be able to run.
It may be useful to tag your runner(s), so GitLab CI knows which runners are suitable for Sigasi CLI runs. Runners don’t particularly need a lot of resources, but, as mentioned, they need access to a Sigasi CLI license on a license server - which may not (and should not) be reachable from anywhere in the world by default.
We’re using the sigasi-cli tag to identify suitable runners for Sigasi CLI
jobs. In our setup, the runners are located on an on-premise computer,
from where the license server is reacheable.
Docker image setup
Making a Docker image for Sigasi CLI is easy. The Dockerfile is shown
below. You can also find it in the docker folder in the demo
project. For CLI itself, most Linux distributions are expected to
work. For our Code Quality demo, Python is also required, so we’ve
based our image on a minimal version of Linux with Python. You also
need to extract CLI inside the directory where you build your
Docker image, so Docker can copy it into the image. Finally, we’ve also configured the
Sigasi CLI PATH and license.
FROM python:3-slim-bullseye
COPY sigasi-cli /opt/sigasi-cli
ENV PATH="/opt/sigasi-cli:${PATH}" \
    SIGASI_LM_LICENSE_FILE=27000@my.license.server
You can build the Docker image with
docker build -t sigasi/sigasi-cli-ci:1.0 .
After this, your docker image is available on your local machine. That’s enough if your GitLab runner will run on the same machine, but if you want to have the runner on a different machine, or on multiple machines, they’ll need access to the image as well. In that case, you’ll want to push the image to a container registry. The good news is: GitLab projects come with a built-in container registry . You can push your container image to the registry linked with your project, and the GitLab runner can pull it from there.
Pushing a Docker image to the container registry requires three steps. In your GitLab project, navigate to Packages and registries > Container Registry for guidance. Before you can push the container image, you need to authenticate to the container registry. The command below is valid for projects hosted on gitlab.com, but will be different if you’re using your own GitLab instance.
docker login registry.gitlab.com
Then, you need to make sure that your container image is tagged
according to GitLab’s naming
convention .
The tag is specified with -t when the container is
built. Alternatively, you can tag an existing image with docker tag. For our demo, the command line was
docker build -t registry.gitlab.com/sigasi/public/sigasi-cli-ci .
Finally, you can push the image to the container registry:
docker push registry.gitlab.com/sigasi/public/sigasi-cli-ci
Project setup for GitLab CI
Now we have a GitLab runner and a Docker container image, so we’re
ready for the next step. The CI run is configured in .gitlab-ci.yml
in the project’s root folder. The file is written in YAML
format , and details of .gitlab-ci.yml are found
here . In our
pipeline, we define a single job sigasi-cli-check. It uses the docker
image which we’ve pushed earlier, and it will require a runner tagged
with sigasi-cli.
sigasi-cli-check:
  image:
    name: registry.gitlab.com/sigasi/public/sigasi-cli-ci
    pull_policy: if-not-present
  tags:
    - sigasi-cli
  stage: test
  script:
    - sigasi-cli verify --fail-on-error .
    # The job fails if any errors are found. Warnings are OK.
    #
    # You can change `--fail-on-error` to `--fail-on-warning`
    # or `--fail-on-info` as appropriate for your project.
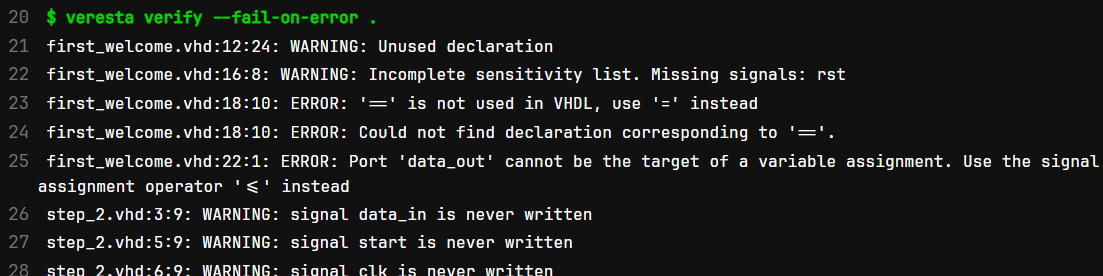
The script is very simple: it just runs Sigasi CLI on the project. The
--fail-on-error command line parameter means that the GitLab CI job
will be marked as failed if Sigasi CLI found errors in the project. With
only warnings and/or info’s, the CI job will be succesful. Using other
command line options, you can change the CI job failure behavior as
noted in the comments in the YAML code.
Running the pipeline
If you have edited .gitlab-ci.yml or any other file in the project,
pushing your changes to GitLab will start the pipeline. You can also
start the pipeline in GitLab: navigate to your project, then CI/CD >
Pipelines and click Run pipeline. Sit back and relax while the
pipeline runs, while keeping an eye on the job log…
Once the job is finished, success or failure of the job indicates whether or not Sigasi CLI has found errors in the project. Check the job log for CLI’s detailed result.
Presenting the results with GitLab Code Quality
In this section, we’ll present a nicer alternative to checking Sigasi CLI’s result in the job. GitLab has a plugin called Code Quality which analyzes code for quality and reports the result. The Code Quality doesn’t support HDL languages by itself, but it can pick up and present results from a custom scanner, like Sigasi CLI.
Code Quality is available in all Gitlab tiers . In the Free tier, findings are shown in the merge request. In Premium, reports are also shown in CI pipelines.
To present Sigasi CLI’s findings with GitLab Code Quality, a small change
is needed to .gitlab-ci.yml.
sigasi-cli-check:
  image:
    name: registry.gitlab.com/sigasi/public/sigasi-cli-ci
    pull_policy: if-not-present
  tags:
    - sigasi-cli
  stage: test
  script:
    # Run Sigasi CLI, write findings as JSON
    - sigasi-cli verify --json -o sigasi-cli.json .
    # Translate JSON for Code Quality
    - python3 scripts/json-sigasi-cli-to-gitlab.py
  artifacts:
    when: always
    reports:
      # Tell Code Quality to pick up Sigasi CLI's findings
      codequality: "sigasi_cli_gitlab.json"
    paths:
      - "sigasi_cli_gitlab.json"
This time, we have Sigasi CLI write out its findings in a JSON file
rather than in the job log. Also, we can’t use --fail-on-... command
line options to Sigasi CLI. When CLI has run, we need to translate
the JSON file with CLI’s findings into a slightly different JSON
file which is compatible with Code Quality. Then, in the artifacts
section, we tell Code Quality to pick up CLI’s findings from the
translated JSON file.
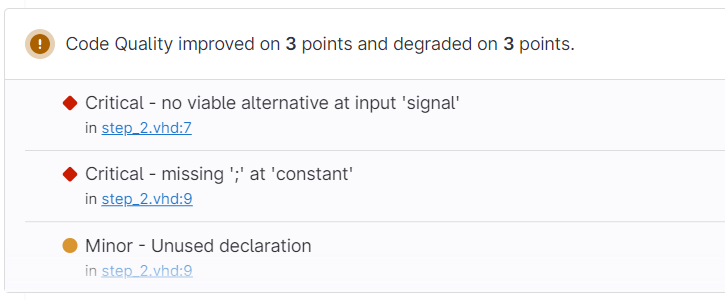
After running a merge request pipeline , Code Quality information is available in the Overview tab of the merge request. You get an overview of improvements and degradations, and clicking on the file/line number takes you to the relevant line of code.
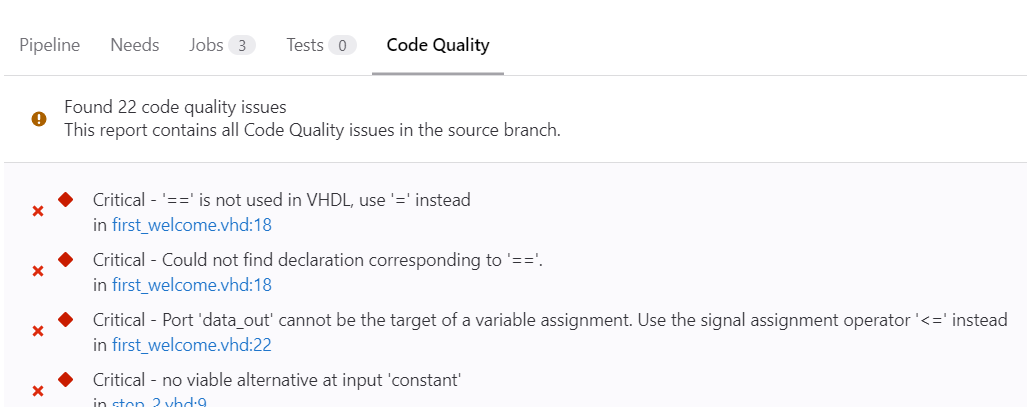
In GitLab Premium, you also get to see all of Sigasi CLI’s findings for each pipeline. Here too, clicking on the file/line number will take you to the relevant line of code.
Conclusion
In this article, we have demonstrated the use of Sigasi CLI in GitLab CI. With minimal effort, one can set up and run CLI in a Docker container to verify the HDL code of your project. GitLab Code Quality is a useful add-on to present CLI’s findings.
See also
- Using Sigasi CLI in Jenkins CI (knowledge)
- Monitoring HDL code quality with Sigasi CLI and SonarQube (knowledge)
- Using Sigasi CLI as a Git Commit Hook (knowledge)
- Documentation generation in CI with Sigasi CLI (knowledge)
- Using VUnit in a GitLab CI Verification Environment (blog post)