At the start of 2023, Sigasi introduced
Sigasi CLI , a command line tool
for HDL validation. In December, we released version 5.4, which introduced documentation generation capabilities, long a favorite feature of Sigasi Visual HDL (SVH).
You can read our earlier article about the importance of good
documentation, which also explains
how SVH can assist you with documenting your HDL
code as you design.
In this article, we walk through how you can generate documentation with Sigasi CLI in Continuous Integration (CI) , using either Jenkins or GitLab CI . To read up on general use of Sigasi CLI, see the CLI product manual.
Sigasi CLI documentation in Jenkins
We’re demonstrating sigasi-cli document with a Jenkins freestyle
project here. Note that it is equally possible to run Sigasi CLI in a pipeline project.
We’re using a fairly simple Jenkins setup, which we explained in
this earlier article. In
addition, we’ve installed the HTML
Publisher plugin.
Before you start, make sure that Jenkins has an executor with Sigasi CLI installed. The executor needs to have access to a CLI license. If necessary, use tags in Jenkins to ensure that your CLI jobs will run on a CLI-capable executor.
In Jenkins, create a new freestyle project and configure your code repository. For demonstration purposes, you are welcome to use our demo repository . Add an Execute shell build step with the following content. (Make sure to set SIGASI_LM_LICENSE_FILE and VERESTA_CMD for your environment.)
export SIGASI_LM_LICENSE_FILE=27000@my.license.server
export VERESTA_CMD=/sigasi-cli/path/sigasi-cli
xvfb-run -a $VERESTA_CMD document design
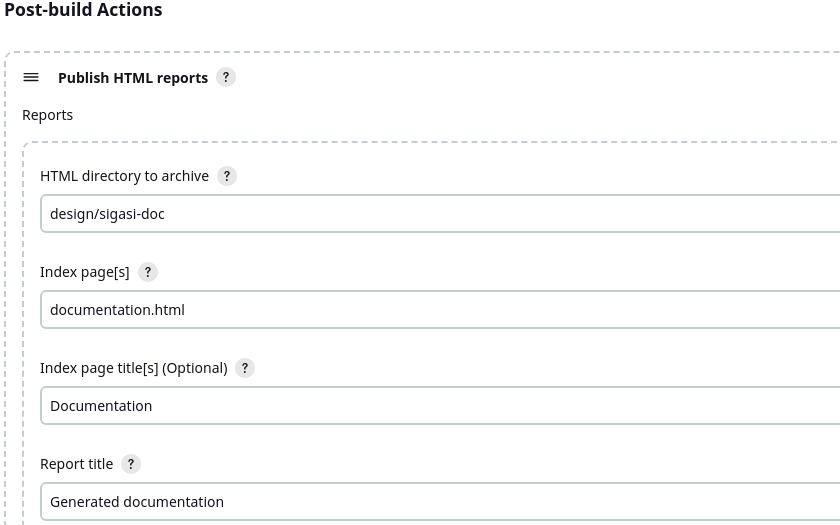
Then, add a Post-build Action to Publish HTML reports. Set the HTML directory to archive to the sigasi-doc subfolder of the design folder. In our example it’s design/sigasi-doc . Set Index page[s] to documentation.html . Also configure the Report title as appropriate.
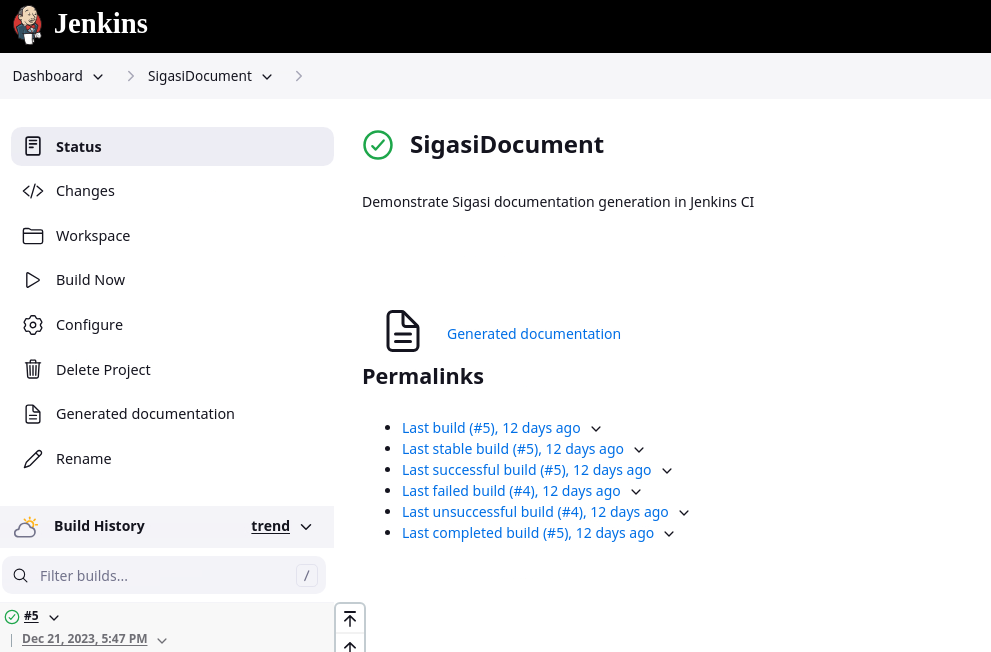
Once that’s done, it’s time to save and run the job. Once the job has finished, the Jenkins project page contains links to the generated documentation, both in the toolbar at the left and in the middle of the page. These links take you directly to the generated documentation. You can add this link to your project’s webpage, wiki, or wherever as a permanent link to up-to-date documentation.
Sigasi CLI documentation in GitLab CI
In this section, we’ll demonstrate how to generate documentation with Sigasi CLI document in GitLab CI.
We’ll also publish the documentation with GitLab Pages .
The example project is available as a public GitLab repository.
You’ll need a GitLab runner with CLI on it. In our example, we’ve
used a Docker container for the purpose. Check out the docker folder in the repository for how to build
a container for CLI. We recommend tagging your runner with sigasi-cli so GitLab CI will run CLI jobs
on an appropriate runner.
In addition to the project, you need a .gitlab-ci.yml file to tell GitLab CI what to do. The content of
.gitlab-ci.yml is shown below. It defines a single job pages which sets op the license and then runs
CLI on the design in subfolder design. Afterwards, the script renames the folder with the generated
documentation and the HTML file for compatibility with GitLab Pages.
# This Docker image will be used to build your documentation
image: registry.gitlab.com/sigasi/public/sigasi-cli-ci:rocky-5.4.0
pages:
  script:
    # Make sure that the license is set correctly for your setup
    - export SIGASI_LM_LICENSE_FILE=27000@my.license.server
    - xvfb-run -a sigasi-cli document design
    - mv design/sigasi-doc public
    - mv public/documentation.html public/index.html
  artifacts:
    paths:
      # The folder that contains the files to be exposed at the Page URL
      - public
  rules:
    # This ensures that only pushes to the default/main branch will trigger
    # a pages deploy
    - if: $CI_COMMIT_REF_NAME == $CI_DEFAULT_BRANCH
  tags:
    # This ensures that the job will run on a runner with Sigasi CLI
    - sigasi-cli
With the GitLab CI job named pages and the public folder saved as an artifact, GitLab CI knows that
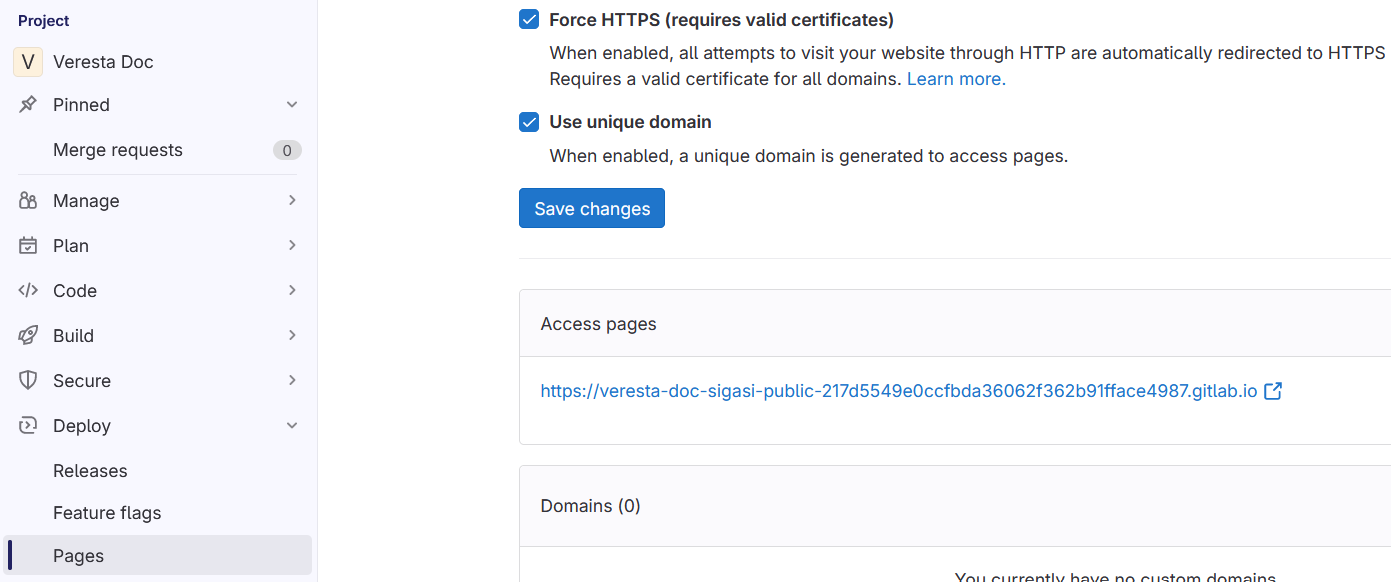
it needs to publish this folder as a webpage. When the job has run, navigate to Deploy > Pages in the left toolbar
to find the link to access the page with the generated documentation.
This link will remain the same after each build, so you can now share this link on your team’s
project page, or include it in README.md in the project root folder as a permanent link to up-to-date
project documentation. You can find the generated documentation of our demo project
here .
Other CI
Generating project documentation with Sigasi CLI isn’t limited to Jenkins and GitLab CI. If you’re using a different CI platform, you can use the above examples as inspiration to integrate CLI into it. If you are using a different CI platform, let us know how you’re using CLI in it. CLI customers are also welcome to contact support . We’ll help you as best we can.
See also
- Monitoring HDL code quality with Sigasi CLI and SonarQube (knowledge)
- Using Sigasi CLI as a Git Commit Hook (knowledge)
- Using Sigasi CLI for HDL Code Verification in GitLab CI (knowledge)
- Using Sigasi CLI in Jenkins CI (knowledge)
- Documentation features for large designs in Sigasi Visual HDL (knowledge)